To Infinity and Beyond (A Birthday Cake)

Buzz Lightyear Cake
This last week was a busy one. Aside from it being Easter:

And therefore filled with hundreds of Easter egg hunts, we also celebrated my daughters birthday. I decided to take a week off from blogging but don't fear, I will be posting regularly again now. I made her a buzz lightyear cake at her request:

Buzz Lightyear Cake


Buzz Lightyear Cake Andy Written on the foot
She also wanted an orange cake but since Buzz Lightyear isn't orange I made the cake orange instead:

Buzz Lightyear Cake has an orange Cake
So thats what I've been up to, I hope you had a good Easter. Zoe x

DIY Scrap Fabric Tape

Sometimes I just can't bare to throw away my fabric scraps, even those tiny ones that would be far too small to actually sew with. This little project is an easy way to use up all those teeny little bits and make something useful with those too. Plus it's dead easy.


What you need:
Fabric scraps of any size
Scissors (can be normal paper scissors)
Double sided tape

What you do:
Simple cut some strips of double sided tape slightly shorter than your fabric scrap. Then stick them down next to each other onto the fabric.

Then use your scissors to cut them up into strips. You can use them straight away by peeling off the paper back or you can store them away for another day if you aren't ready to start wrapping.


These are pretty sticky so can hold the paper around a present but they don't last as well as washi-tape so sadly you can't use them to decorate with. They're good fun though and make your presents look pretty. Have fun, Zoe xx

Dished up: Pea and Ham Pasta

I spend time planning a menu for each week so that I don't have a panic at half four every day about what I'm going to cook for dinner. Sometimes plans change though and so does the menu and tonight was one of those nights. So as I stood in front of the fridge looking for inspiration I spotted some left over roasted gammon. Roasting a chunk of gammon is another trick of mine for a cheap sandwich filler, it is much cheaper than buying sliced ham. If you don't fancy gammon for your roast dinner just slice some for lunches and add some to a few store cupboard ingredients and you have this easy, speedy, cheap and tasty dinner

My father in law is from Sicily where Pasta and Peas is commonly eaten so I figured if I took that concept and combined it with the idea of pea and ham soup I should be on to a winner. Try it yourself and let me know what you think.

Cooking Time: you can easily make this dish in under half an hour.

What you need: 
200g left over roasted gammon, shredded
Olive oil
1 onion, finely chopped
2 cloves garlic, crushed
200g frozen peas
400g pasta of your choice, I used fusilli
Freshly ground black pepper
Freshly grated Parmesan

What you do:
1. Splash a good glug of oil into a pan and pop in on a low heat. Fry the onion until it is softened and just beginning to colour, about 10 minutes.
2. Meanwhile cook the pasta in a pan of lots of boiling salted water according to pack instructions.
3. When the onions are beginning to colour add the garlic and cook for a minute longer.
4. Add the peas to the cooked onions and continue to cook for a few more minutes until the peas are hot. Add the ham and warm though. Season well with pepper.
5. Drain the pasta well and stir into the ham and peas.
6. Serve with a good grating of the grated Parmesan.

I'm always looking for new pasta dishes as my husband would happily eat pasta most nights so I was really pleased to come up with this combo. It went down a treat with my tribe.

Cassie xx


Sew Your Own Pegbag

For about a year my pegs have been residing in a plastic bag that had seen better days. I decided it was about time I stitched up a new, and slightly more robust, home for them. This is a project that is pretty simple and a beginner sewer could tackle.

You Will Need:
About 1/2metre (or a fat quarter) of fabric
A hanger (I used a child size hanger)
Sewing machine (or needle and thread)
Iron and ironing board
Thread

Make Your Pegbag:
First of all you need to cut your fabric, you can use a dressmakers chalk if you have one but a pencil will do to draw around the top of the hanger about 1cm away from the edge like below:

Instead of drawing around the bottom of the hanger draw straight down as long as you would like your peg bag to be plus 1cm, cut one piece out this size and cut another out about 3cm longer.

Take the larger of the two pieces and cut it so that you have one large rectangle at the bottom and the hanger shape plus 2cm of the length at the top. Then fold the top over by 1/2cm towards the wrong side of your fabric, press and stitch. Fold the edges you have just cut over by 1/2cm towards the wrong side, press, fold over by another 1cm and press again. Then stitch all of these seams down:

These two pieces will form the opening for your pegs to go in. On the other piece of fabric, the back of the peg bag, you will also need to fold over the very top by 1/2cm towards the wrong side, press and stitch.

Now put the back piece on your work surface so that the pattern is facing up. On top put the two remaining pieces, lining up the seams that form the opening like this:

Pin these together. Then starting at the top on one side of the small seam you sewed stitch all the way down the side, along the bottom, and up the other side. The only tricky part here is the curves so go slowly. When you get to the corners, put your needle down and your footer up, turn your work and put the footer down again before you continue. Don't stitch across the top though as you need a whole for your peg to go through. It should look like this:

Now Snip off the corners (without cutting through your stitching), turn it out the right way and press. Finally pop your hanger in through the large opening and hey presto:

One simple peg bag. As if the sunshine wasn't reason enough, now you can easily hang all your clothes on the line to dry. Zoe xx

Green Sorbetto Top With Sleeves

I've made myself another sorbetto, I shared about one I made with a peter pan collar already. This one is more simple and is much closer to the original pattern but I did add sleeves! A friend of mine was clearing out some fabric and gave this to me so, with the free sorbetto pattern it hasn't cost me a penny. Winner.

I continue my quest to make myself useful clothes. This is a pretty useful top, not too fancy so I can wear it every day but the fabric makes it more special than your average top. This time I omitted the pleat down the front, made the sleeve pattern and used a neckline facing rather than the bias binding that the original pattern has. I kept the original length this time and it is a little shorter than I would usually wear but I thought it was right with the sleeves.

I am a little distracted from crafting at the moment because I am really into my book and its very difficult to craft and hold a book open at the same time. Its a good job this little number only took a few hours to sew together. Oh and I have almost finished a skirt that I am hoping to show you soon (with instructions) so all is not lost. But right now it't time for a cuppa and to read another chapter or two. Zoe xx

Me Made May 2014

Have you heard of Me-Made-May? Well I expect many of you haven't so I will let you in on the secret (well not a secret really). Me-Made-May is one month each each in May (obviously) when sewers and bloggers get together to challenge themselves to wear more of their homemade clothes. You can read more about it over at So Zo… What Do You Know? But each person pledges their own personal challenge of what they plan to do during May to wear more of their handmade clothes.


My Pledge is as follows: I Zoe sign up as a participant of Me-Made-May '14. I endeavour to wear one item of handmade each day for the duration of May 2014.


For those of you who have been reading along with Tadpegs over the last year you will know that I don't own enough handmade clothes to wear something new every day, so I will probably repeat some items and I am also going to include handmade accessories, because well I can. I will post a few times during may to show you what I have worn so far and then again at the end of the month to let you know what I thought of the whole thing. If you want to follow along more closely then you should follow me on instagram, I plan to do daily outfit photos. Or if you want to follow along with Me-Made-May in general you should head over to flickr and follow the group.


In the mean time I have a few other items I have sewn together to add to my wardrobe that I will share with you soon. Plus a few other DIYs from me and recipes from Cassie, Zoe. xx

Dished Up: Broccoli and Bacon Salad

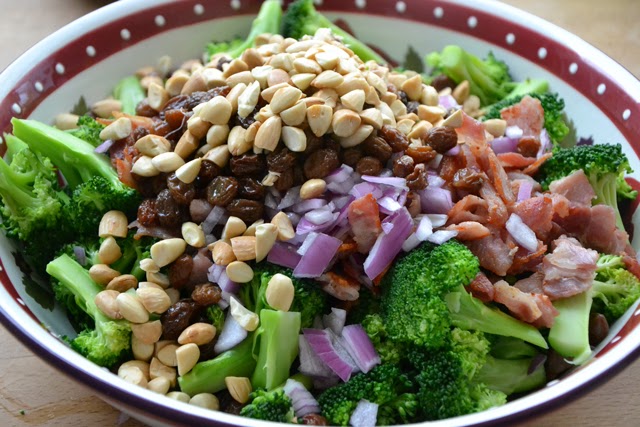
I adore barbeque season. The joy of eating outside combined with a plate loaded with different flavours is my idea of heaven. And our family sure know how to do a bbq! I love to try out new recipes for both salads and desserts but there is one dish that we bring out every year; Broccoli and Bacon Salad.  Just this salad alone provides sweet, salty and tangy delights and 3 of your '5 a day'. Our church provides some mean catering for weddings and this salad is often on the menu. A friend brought the recipe over from America so it's original source is unknown. If the dish is good enough for weddings is definitely good enough to grace your menu this summer.


What you need:
3 medium broccoli, cut into florets
1 medium red onion, finely chopped
1-1.5lb bacon
1/2 cup of toasted flaked or roughly chopped almonds
3/4 cup raisins, soaked in water for an hour or overnight
1/2 cup sugar
1 1/2 cup mayonnaise
1/4 cup vinegar


What you do:
1. Blanche the broccoli in boiling water until it is tender, about 5 minutes.
2. Chop the bacon into cm cubes and fry it until crisp.
3. Put the broccoli and bacon in a large bowl with the chopped onion, toasted almonds and soaked raisins.
4. For the dressing mix together the sugar, mayonnaise and vinegar until smooth.
5. Just before serving pour the dressing over the salad. Gently fold the dressing through salad mixing the ingredients and covering them in the dressing taking care not to break up the broccoli. Serve immediately.

If you're allergic to nuts the almonds can easily be substituted with pumpkin seeds.

Our Mum made the broccoli salad in the photos and I was on pudding duty so I made a chocolate and coconut banoffee pie from the BBC Good Food website. If you like sweet desserts you should try this but read the comments as getting the coconut cream thick enough can be challenging. we had it alongside a lemon cheesecake and some summer fruits. One dessert sometimes simply isn't enough.
Cassie xx
Related Posts Plugin for WordPress, Blogger...