Showing posts with label Dress up dolls. Show all posts

Make a Dress Up Dolly: The Clothes


On Monday I shared with you the tutorial for making a dress up dolly so next we need to make her (or him) some clothes. You can make up your own clothing shapes if you like but I have kept mine fairly simple. I have however made each dolly their very own 'super-suit' with their initial on the front, hehe!

What you need:
1 dress up dolly (see tutorial)
1 template from your dolly you have already made
fabric scraps
sewing machine
white thread
fusible bondaweb
Felt ( I used one colour for each dolly that I made so they didn't mix up their clothes).


Method:
Start out by ironing some bondaweb onto several bits of fabric, I used bits and pieces that were left over from quilting mainly but I would suggest having some denim and some white. For your other fabrics try and use fabrics with small patterns or that are plain because the pieces you will cut out will be very small.


Now to make your clothes templates use your dolly template as a guide and draw clothes shapes to fit her. You can be as imaginative as you like, if you want to make a super suit for yours then just cut off the head and hand from your template when you're done and use then. Then draw around these onto the paper side of the bondaweb. This is pretty fun because you can design an entire wardrobe out of your fabric scraps. If you are making a super suit for your dolly make sure you cut out the main suit form one colour and the boots, pants and initial from a second colour.

Then you need to cut out your clothes shapes from your fabric, take off the paper backing and lay them onto your felt so that none of them over lap. Leave off your boots, pants and initial of that super suit because you need to bond these to your suit NOT to the felt. (If you want to make a mask for your dolly to coordinate with your suit you will need to glue this to some prickly velcro.) Take a tea towel and iron the clothes onto the felt until they have bonded.

Next you can place the boots, pants and initial onto the super suit and iron these on (don't forget your tea towel!) You can also iron on any other details you like, for example a collar in a contrasting colour, a pocket on a dress or a pretty hem maybe.


Once these are all ironed to the felt you can use your sewing machine and stitch extra details onto the clothes like hems, pockets or embroidered details using some more fancy stitches.


This looks very messy because of all the loose thread but when you cut out these pieces, which is the next thing to do, they almost all get trimmed as you cut any way.


And there you have it, a lovely dress up dolly and her entire wardrobe. And now you know how you can add to her wardrobe any time you like. I hope you're little one enjoys it too. Zoe xx

You can find this and other tutorials over at Stitch By Stitch.

Make a Dress Up Dolly: The Dolly


For Christmas this year I made two of my nieces and my daughter their own dress up dolly. It was fun to make and fun to play with. I especially enjoyed making the dollies their own super hero suit! I had seen a version before (no superhero suit though) that I think was called 'flats' but I cannot find the link any where so I have decided to write my own tutorial for those of you who would like to make one for the little girls in your life. It is broken down into 2 parts: the dolly and the clothes. I have made 3 dollies so some of the photos show all three but obviously you can just make one or two if you want to.

You Will Need:
Flesh coloured felt
Hair coloured felt (I used brown and orange to coordinate with their hair but you might need yellow or black)
Iron-on fusible bondaweb
Backing fabric
Velcro (just the prickly side)
Hot Glue

Method:
First of all make yourself a template, feel free to print out one of my pictures as a guide or just fold a piece of paper in half and draw half a person and then cut it out. Next iron some fusible bondaweb onto your backing fabric and then draw around your template onto the paper side. Cut these pieces out and then remove the paper. Put the side to stick face down onto your flesh coloured felt, cover over with a tea towel or some other fabric and iron the person to the felt. The felt won't survive under the heat of the iron without the tea-towel. When it has fused cut out the person again. You should now have your felt person fused to your backing fabric.


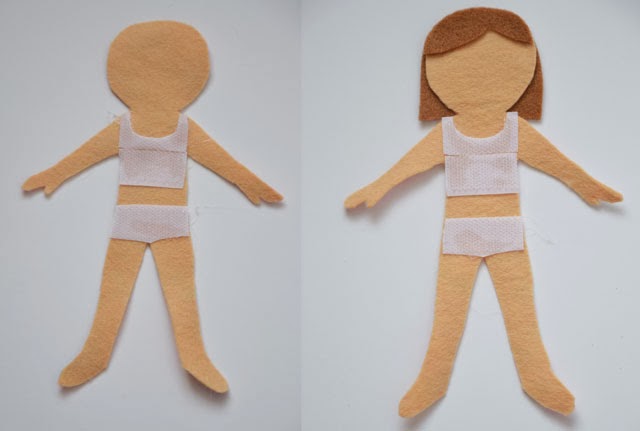
Now you need to make the 'underwear'. Using your template, measure some velcro to cut out knickers and a vest. You will probably have the vest in two pieces. Then use your glue gun to stick them on. I stitched a line around the neck line, vest hem and waist band using my sewing machine to make them extra secure but this is not totally necessary.


Next cut out your hair pieces using your template as a guide from the right colour felt and again glue these on. Your dolly is complete! Hold on to your template as you will need this next week to make the clothes. Zoe xx

You can find this post and many other on Snippets Of Inspiration here.
Related Posts Plugin for WordPress, Blogger...