Showing posts with label Sewing Machines. Show all posts

A Guide To Buying Your First Sewing Machine


A while back I posted about what you need to learn to sew no matter how small your budget. I suggested that when you first start it's pretty easy to borrow a sewing machine. That is still true. But you can't borrow something indefinitely. At some point you reach the stage where you need to actually invest in a sewing machine yourself. So I thought I would write a little guide about what to look for when you want to make that investment.

First of all I want you to know that I think your investment will be worth every penny. It may seem like a big outlay at the moment but if you choose wisely you will have a piece of equipment that you can use for decades to come. You will probably end up saving money in the long run, especially if you start to make your own furnishings and clothes, but even if your goal is to just break even you will also have hours of fun ahead of you.

Work Out Your Budget 
The first and most important part of making any purchase is working out your budget. Maybe you don't have to worry too much about this, you know that on your next pay day you'll have a few hundred pounds ready to spend or it might even already be in your bank account. Well if you're like me then this probably isn't the case. Buying a sewing machine might require a few months of saving, maybe some birthday/Christmas money too. Have a realistic think about how much you can afford to spend or how much you can save over the next few weeks and months and set yourself a maximum budget. This figure should be your top amount and you should be stubborn about sticking to it. However bare in mind that this is a longer term investment too, if your savings over the next couple of weeks will only get you the cheapest machine then it is probably worth saving for a bit longer. Aim to spend at least £100 and you'll be able to find a decent machine. If you can afford more you'll be able to be a little more choosy about the make and model you purchase.

Choose a Brand
Choosing the brand of your sewing machine is half the battle. Once you have made this decision you will only have a few sewing machines that match your budget to choose from. There are several big brand names for sewing machine to consider. Singer, Janome and Brother are 3 of the most famous but there are others to consider. Most of these can all offer similar quality machines so there isn't much in it. I suggest you ask yourself these questions about the brands your considering:

Which brand can I buy locally?
If you can shop locally for your machine then this is a great bonus. You'll be able to see the actual machine before you purchase it, if you have any problems with it you know where to go and its much quicker and easier than sending it off somewhere and you'll be supporting a local business.

Which brand do I know?
If you have been learning to sew chances are you already have an affinity to one particular manufacturer. Ask yourself what you like about this brand and what you aren't so keen on. It might be that these things are unique to that make or model, or it might be that every brand has them in common. Do a little bit of research into what the other brands offer before you decide but you may find you have all your need with the one you know.

Which brands have I been recommended?
You might know some one who sew often and has tried about a few machine, give them a quickly call and ask them about what they use and why. It might they have just always stuck with the same thing but they might be able to offer you some insight that you hadn't thought of before. Plus reading review online is all very well but that tends to be only a very small sample of the people who actually use it and you don't know them. Asking someone you know and trust is always a good idea.

Make a List of Your Minimum Requirements
Once you've chosen a brand you can start making your lists. Write down what you think are the absolute essentials for a sewing machine. Depending on the type of sewing you will be doing this list will be quite different. This would be my recommended list of what you will need your sewing machine to do:

Sew straight and zigzag stitch
Sew a button hole
Have a standard foot, zipper foot and be able to attach other feet that you can purchase later

And that is really it. Then you can think about what other accessories are important to what you're planning to make. After the next step (making a wish list) you might bump up a few of those onto your essentials list.

Make a Wish List
This is where you can start to think about what you'd sew if you could do anything. Maybe you desperately want to start sewing with leather in which case you'd need a more heavy duty machine. Perhaps you love the idea of sewing lots of pretty blouses then maybe looking for some fancy decorative stitches will be useful. You might have in mind that you want to sew while you watch TV or while your kids are sleeping so you'd like a quieter model. Whatever you are hoping for write it all down. Everything you can think of is important.

Then once you have your wish list work out which of these things is the MOST important and which are the least important. If you can put them in the right order. You might realise that some of these things are so important to you that you want to bump them up the the essentials list. Then you'll have one list of essentials and one list of 'nice to haves' ready to have with you when you go shopping.

Ask Lot's of Questions
This is easier to do if you are going into an actual shop but don't be afraid to ask questions. Tell the shop keeper your essentials and some of your wish list and share your budget with them (maybe say a little less than your actual budget). Ask questions like "How often to people have to have these machines repaired?"; "How much does a service cost?"; "How much do the extra footers cost?" and "How many layers of Denim can it handle?" Or any other question you come up with. Read some review too and see what other people think. If you can try it out and see if you like the feel of it.

Remember that if you are in a shop the shopkeeper will be trying to get the best sale he can out of you though, he might be trying to get you to buy a machine that's £20 more than one that will be perfect for you. You don't have to spend your entire budget just because you have it, you can spend your change on fabric if you have some!

Take Your Time
If you are borrowing a machine then there is absolutely no reason that you need to buy your machine TODAY. I know the feeling of saving up and having the money burning a hole in your pocket but I would suggest once you've had a good look around think on it for a couple of days (at least) before actually making your purchase. Then you'll be sure you buy the right machine for you.

I love my sewing machine (by the way its a Singer Confidence) and I don't know what I would do without it. I hope you can use this list to find a machine that you learn to love too. Once you do I would be delighted if you wrote in the comments section what you chose and why and then others can learn from your shopping decisions too. Happy shopping. Zoe x

Sewing School // Have a Go At Sewing

So now its time to get sewing. You've got every thing you need and set up your machine ready so let's go for it. Take you fabric and pop it underneath the presser foot, you'll need to lowers the presser foot by pulling down the presser foot leaver:

For now it doesn't matter too much where a bouts you will start sewing, we just want to get a feel for the machine first of all. You will need to select a kind of stitch (start off with straight). Then you can lower the needle by turning your dial in the top right hand corner of your machine.

Now press down gently on your foot peddle and the machine with start to sew. Start with just a few stitches and then lift your foot off the peddle again.

Now you should press down on tho button (if you machine has one) and it will do a few stitches back in the opposite direction. This gives you a nice secure start for your sewing and is a good idea whenever you start a line of stitching. When you get back to where you started press down on the foot peddle again and sew a long line of stitches. Guide the fabric under the machine, it will be pulled through automatically but your job it to try and get a nice straight line.  Get a feel for the machine by pressing gently at first and then harder and see if you can start to control his fast you'd like it to go. Don't worry if your line isn't straight just yet, it does take a bit of practice.

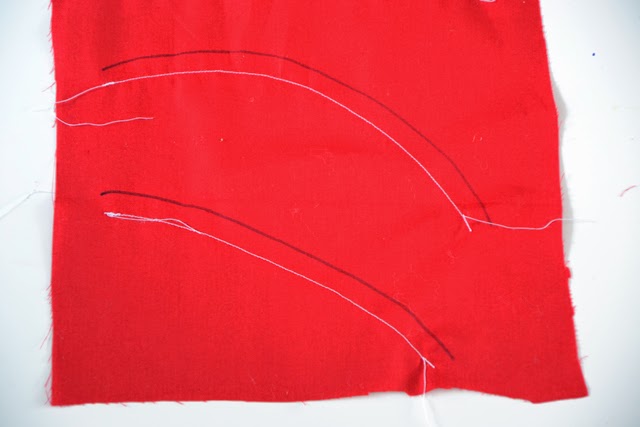
You can draw some lines on your fabric with a dressmaking pen/dressmakers chalk and use these as a guide for sewing straight. I would recommend trying to keep the edge of your foot in line with the line (as above) rather than your actual line of stitching along your line. When we sew a real project we would usually stitch a certain distance away from the edge rather than along a particular line. So as you press down on the foot peddle keep your eyes on the line and try to keep it in line with the edge of the foot.


When you get to the end, use your little button (or your dial) to sew a few stitches in reverse to secure then end, then lift up the foot, pull our your fabric and snip the threads. Tada, your first line of stitches! Now have another practice until you start to be able to do all of that without having to read the instructions.

It is also good fun, and great practice to try and sew along some curved lines too. In the same way draw some curves on your fabric and have a go a sewing next to these, keeping the drawn line in line with the edge of the foot. Don't forget to sew a few reverse stitches at the beginning and the end.

Many beginner projects won't have any curves in them so don't worry if you can't get this right yet. If you come back on Friday I will be going through what a seam is and how to follow it. Zoe x

To Find out more about Sewing School click here.

Sewing School // Hello Sewing Machine

Now that you have everything you need to learn to sew it is time to start using it. First of all you need to set up your sewing machine. If you have borrowed one from someone they might have given you a whistle stop tour which will be helpful but I will break it down for you today so you can begin to understand what they were on about. If you have your own sewing machine and your manual to hand, thats good because every sewing machine make is slightly different so you may need to look some things up.

My sewing machine is a Singer Confidence which was a birthday present for my 21st. Whatever brand you have the basics are the same. Before you can start sewing you need to set your machine up. The very first step is 'winding the bobbin'. So plug your sewing machine in and turn it on. You will also need to connect up the foot peddle. Once you are all plugged in, make sure you can sit on a chair with your sewing machine in front of you an can comfortably reach the peddle with you foot. Don't press on the peddle yet though!


Wind the Bobbin
To wind up the bobbin you need to put some thread on your machine. You may have one or two places to put your thread on. My machine (as indicated by the arrows) has two. The larger arrow points to a horizontal post, if you have one of these it is a better option for where to put your thread reel, just slide your thread reel on an then put on a little stopper to prevent the reel from coming off. The smaller arrow points to a little hole where a similar post can go but is vertical. You may only have this vertical post on your machine but pop your thread reel on in the same way. I am using my vertical thread post this time because my reel is too large for the horizontal one.

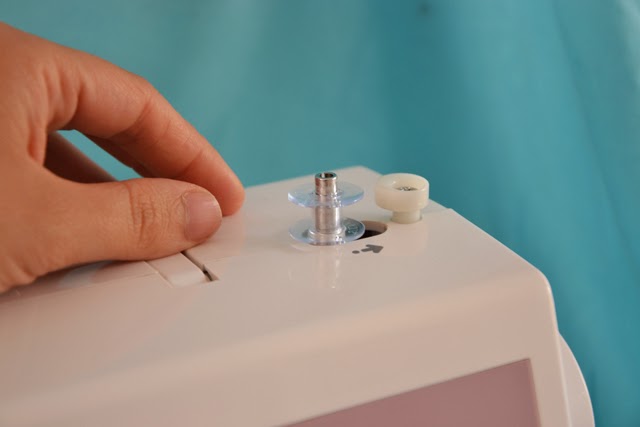
Then you need to pop a bobbin on to your bobbin winder as above.

Take the end of your thread from the reel and pull it under the guides. First under the metal guide at the back and then around the round winder guide as shown.

Finally there is a little hole in your bobbin which your thread needs to go through from the inside to the out. You may find it easier to take the bobbin off to do this but I prefer to do it while it is on. Then push your bobbin over to the right until it is up close the the bobbin stopper.

Now hold onto the end of the thread and press down on your foot peddle. This will start the winder turning around and will wind up thread onto your bobbin. Once the bobbin has enough thread on it should stop winding up, thanks to the winder stopper. It should look like this:

Now snip your thread and you can take the bobbin off the machine.


Attach the presser foot
If you haven't already got a 'foot' on your sewing machine this will be the next thing you need to do. Choose the foot that looks like the one above and rest it under the place where your needle is. The pull down the 'presser foot lever'. The foot should snap onto the foot holder but if it doesn't work first time wiggle it around and try again. The next thing to do is to thread the reel.


Thread the Reel
Your thread reel should still be on the top of your machine in the right place. Take your newly cut end (after winding the bobbin) and pull it behind the thread guide as you did when winding the bobbin. This time instead of taking it to the right and into the bobbin you need to pull it down the right hand slot in the front of the machine (as above).


When you reach the bottom of the slot, pull it back up the left hand slot and around the metal lever, then back down the same slot. When you reach the bottom of this slot, take the thread behind the thin metal hooks that are at the top of the needle and finally push the end of the thread through the sewing machine needle from front to back.You may find you need to snip the end of the thread to get rid of any frayed ends to make it easier to pass it though the needle.

Next up you need to put the bobbin under the needle plate ready for sewing, we call this threading the bobbin.


Thread the Bobbin
Again this varies from machine to machine but I will go through how to load your bobbin on a top loading machine. There will be a little plastic cover just underneath where the needle is, you will need to take this off. Then pop your bobbin inside the little round space, making sure the thread end is coming off in an anti-clockwise direction. My machine has a handy little diagram to show you how, but don't worry if yours doesn't, you'll get used to doing this quickly enough.  Pull the end of your thread out and underneath a little metal groove near the front of the bobbin.

Finally you need to bring the thread from the bobbin up so you can start sewing. The end of your thread from the bobbin needs to be up near the needle plate. Using your left hand hold on to the end of the thread from the reel, then with your right hand turn the hand wheel, on the top right of your machine, around. Turn it until the needle has gone down and up again and it will pick up the thread.  Then use some small scissors to scoop the thread out of your machine. Now pop your plastic cover back on.

And thats it, you have set up your machine ready to have a go a sewing. Come back on Tuesday to learn how to do so. Zoe xx

For more about Sewing School have a look here.


Related Posts Plugin for WordPress, Blogger...