When it comes to choosing fabric for a sewing project the options are almost endless. This for me is the best part about being able to sew, I can choose exactly what I want my dress/quilt/'insert any other fabric made item here' to look like. I am not limited by what is currently available in my local shop or online. If I like a particular style that went out of fashion twenty years ago I can remake it today. But before you reach the stage of making anything you'd like from any fabric you can find you will need to know a little bit about what to look for.
What Kind of Fabric?
Most good patterns that you find will give you some suggestions of the type of fabric to buy. I would say, before you consider what print you'd like the fabric to be, you need to think about 3 main factors of your fabric.
1. How Thick Do I Need My Fabric To Be?
Fabric can vary from very thin (or lightweight) to very thick (or heavy). The lighter it is the more floaty your fabric will be. Aim to buy something as close as possible to the suggested fabrics on the list. For example, if you're hoping to make a summery vest top you'll probably need something quite lightweight, but you could probably get away with something a little thicker if you find something you love. But your top just won't look right if you try and make it form some upholstery cotton (which is very thick and heavy). In contrast if you want to re-upholster a chair then the lightweight organza you have fallen for probably isn't going to be hardwearing enough to cover your furniture.
2. What Is It Make From?
Most fabric you will find will probably be cotton based. Cotton is a good place to start when you are learning to sew, it's easy to work with, washes well and comes in every colour and pattern you can probably imagine. If you have a look in the labels in your clothes you will see some other options of what is available. When you get dressed over the next week or so check out each label and feel the fabric until you have an idea for what different fabrics feel like. I can't possibly list everything that is available here but your project pattern will probably have some suggestions and you can always ask in your local fabric shop, they'll be happy to explain it all to you.
3. Does is Stretch?
If your project says you need a stretch fabric then buying something that doesn't stretch simply won't work. Fabrics with no stretch (or at least very little) are much easier to sew with when you are just learning so look out for projects made from 'woven' fabrics. Woven simply means that the fabric won't be stretchy. When you have mastered this you can move on to the stretchy stuff. When it comes to stretchy there are two mains kinds. Firstly 'knit' fabrics which have non stretch cotton threads knitted together to give it some stretch. Or 'jersey' which are made from stretch threads.
Where Can I Buy Fabric?
When you first start out buying fabric it can be tough to find the right place that sells what you are looking for. Find out if you have any local shops that sell fabric. Some fabric shops may only sell a certain type of fabric though, for example we have a little shop near us that sells quilting fabrics and they're all quite traditional prints. I would come out an unhappy shopper if I went in there looking for something to sew up a party dress. But you might find something near you that sells exactly what you are looking for. Once you have looked locally have a browse online, there are now hundreds of places that you can order your fabric from and most are happy to send you a sample before you purchase a few metres. You can also have a look on eBay, you'll probably be surprised how many companies sell fabric via eBay. The fabric shown at the very top of this post is all vintage sheets collected from charity shops or car boot sales so don't rule these out as options for places to look.
How Much Should I Buy?
Fabric usually comes in 1 of two widths, either 45" or 60" across. Then you can buy whatever length you need of that width. Most patterns will tell you right at the start how much of each width you need. Sometimes a pattern will talk about Fat Quarters (or FQ's). To get a Fat Quarter the seller will cut 1 yard of their fabric, then cut in half and in half again. Thus they make 4 pieces, or 4 quarters of a metre; hence Fat 'Quarter'. Buying fabric by the fat quarter is really handy if you are making something that needs smaller pieces such as a quilt or a cushion cover. If you are making something larger like clothing and you don't have a particular project in mind yet then 2-2.5m of the fabric will be enough for most items of clothing. You can always buy it and look for what you want to make with it afterwards.
Finally, What Do I Do With It?
Having spent all that time and effort choosing the perfect fabric it can be quite nerve-wracking to cut into it. To help you out I will explain a few things about it.
1. The Selvedge Edge
All fabrics come with a selvedge edge. This is a couple of centimetres of the fabrics running all the way down the edge that is woven more tightly than the rest to stop the fabric from unravelling when it's on the roll. As above, on many fabrics the selvedge will be a different colour to the main fabric, it may have little colour dots (or rabbits heads apparently) that represent the different colours in the fabric. This can be handy if you are trying to find to fabrics that will coordinate. Its a good idea when cutting the pieces for your project to avoid the selvedge. You won't want this showing on your project. If you know they will only be in your seam allowance then you can include them but only do this if you are sure. On plain fabrics the selvedge will probably be the same colour as the main fabric, you will be able to find it though by feeling along the edges, the one that feels the thickest is your selvedge.
2. The Right and Wrong Side
Most Fabrics have a right and a wrong side. As you can see above the 'right side' has the vibrant colours on and the 'wrong side' will be paler. On plain fabrics you may not be able to see a difference between the sides. When you cut out pattern pieces from your fabric make sure you cut them all out from the same side or you may find they don't match up properly. Also remember that most of the time you need to sew the pieces with 'right sides together' so that the seam will be on the back.
3. The Grainline and the Bias
These two words are important when it comes to cutting up your fabric. They both refer to a direction along the fabric. The Grainline is the direction that is parallel to the selvedge. Many patterns will have markings on to show you which way the grain line should lie for each pattern piece. Try to put this line as close as possible to the grain line.
The Bias on the other hand runs diagonally across the fabric. If you cut your fabric on the bias it has more movement and becomes almost stretchy. It can be very important to cut your fabric on the bias. So when you start cutting it up pay close attention to which direction you need to cut.
So there you have it, this guide to fabric will set you off in the right direction as you learn to sew. I am adding an extra section in to 'Sewing School' before I give you some suggestions for beginner projects on understudying patterns. So come back on Friday to see this. Have fun. Zoe xx
Sewing School // Everything you ever need to know about seams
Now you know how to set up your machine and use it, it's time to start learning some of the basic sewing terms so you can begin to understand instruction in a sewing pattern. One of the most important term to learn is a 'seam'.
What is a Seam and Seam Allowance?
The seam is where two fabrics are sewn together along their edges. Most of the time when you sew, you are creating a seam. The seam allowance is the distance between the very edge of the fabric and the place where you need to sew. When you start a sewing project the seam allowance will be given to you, it may be different in different parts of the project but usually its the same all the way through. Conventionally in patchwork type project we use a seam allowance of 1/4 inch (6mm) while in dressmaking the usual seam allowance is 5/8 inch (18mm).
Sewing a Straight Seam
Most project include some straight seams, this is when the edge of your fabric pieces are straight with no corners or curves. To sew a Straight seam, first of all you need to put your two pieces of fabrics 'right sides together'. I will go into this in more detail when I talk about fabric on Tuesday but the side of your fabric you want showing on the outside of your project needs to be together:
Then you can pin your fabric piece together. Take your pins and push them through the fabric from the top to the bottom and then back up to the top again. The pointy end of the pin should be pointing into the fabric and away from your seam:
This makes it easier to take it out again before you sew that section. Put pins all the way along the edge you want to sew at regular intervals.
Once sewn you can open out the fabrics, the seam allowance and the stitching will all be hidden around the back. You'll notice though that this won't lie flat yet. You'll need to press the seam with your iron. Plug your iron in and turn it up to the highest heat that your fabric can take without changing shape. On the seam side, or the back, of you fabric you will need to iron along the seam. There are a couple of options:
Either press both edges over to the same side, called 'pressing the seams to one side'. Or press the fabric edges in opposite directions called 'pressing the seam open'. It depends on the project that you a are doing on which way you will need to press the seam. For quilts its usually over to open side and for clothes its often open but can vary from project to project.
Finishing the Raw Edges
When we cut our fabric it can start to fray, especially if we use a lightweight fabric or when we wash it. To minimilise this we 'finish the raw edge'. There are many ways to do this so I will just go through two of the simplest ones for now.
The top example shows zigzag stitching along the raw edge. To do this simply select the zigzag stitch on your sewing machine and sew all the way along the seam. You can do this with both pieces together as I have when your seams are pressed to one side or you can zigzag stitch along each edge if you have pressed your seam open.
The bottom example shows an edge finished with pinking sheers. These are very sharp scissors than cut a zigzag line. You would need to invest in some pinyin sheers to do this method but its much quicker than zigzag stitching all your seams so its worth thinking about if you want to get your project finished quickly.
Stitching Corners
Some seams may require you to stitch a corner. This is actually much easier to achieve than you may think. Simply sew along one edge, when you get to near the corner turn your wheel in the top right hand corner of your machine until the needle is down:
Then flick up your presser foot lever:
Then turn your project around so you can start sewing along the other edge:
And flick your presser foot down again to start sewing. See easy peasy.
Stitch Curved Seams
Some project will require a curved seam. Usually the two curves that you need to sew together will be the same length but different shapes.
When you pin these together you need to 'hill' of the curve to be on top and the 'valley' to be underneath but still with right sides together. This will make it much easier to sew together. Pin as you did with the straight edge, pins all the way along the edge at regular intervals with the point going in towards the fabric from the seam. You need to curve the 'valley' seam around as you go.
Now when you take the seam to the sewing machine ready to stitch it will curve upwards, this makes it much easier to feed it into the machine. You pins will still be in the right direction for you to easily pull them out as you sew. Other than the pinning part, sewing a curved is exactly the same, start and end with a few reverse stitches and keep the edge in line with the right part of your needle plate.
Now you know everything you need to know about seams (well almost). Come back on Tuesday to find out about fabric. Zoe
Find out more about Sewing School here.
Labels:
Seams
,
Sew
,
Sewing School
Sewing School // Have a Go At Sewing
So now its time to get sewing. You've got every thing you need and set up your machine ready so let's go for it. Take you fabric and pop it underneath the presser foot, you'll need to lowers the presser foot by pulling down the presser foot leaver:
For now it doesn't matter too much where a bouts you will start sewing, we just want to get a feel for the machine first of all. You will need to select a kind of stitch (start off with straight). Then you can lower the needle by turning your dial in the top right hand corner of your machine.
Now press down gently on your foot peddle and the machine with start to sew. Start with just a few stitches and then lift your foot off the peddle again.
For now it doesn't matter too much where a bouts you will start sewing, we just want to get a feel for the machine first of all. You will need to select a kind of stitch (start off with straight). Then you can lower the needle by turning your dial in the top right hand corner of your machine.
Now press down gently on your foot peddle and the machine with start to sew. Start with just a few stitches and then lift your foot off the peddle again.
Now you should press down on tho button (if you machine has one) and it will do a few stitches back in the opposite direction. This gives you a nice secure start for your sewing and is a good idea whenever you start a line of stitching. When you get back to where you started press down on the foot peddle again and sew a long line of stitches. Guide the fabric under the machine, it will be pulled through automatically but your job it to try and get a nice straight line. Get a feel for the machine by pressing gently at first and then harder and see if you can start to control his fast you'd like it to go. Don't worry if your line isn't straight just yet, it does take a bit of practice.
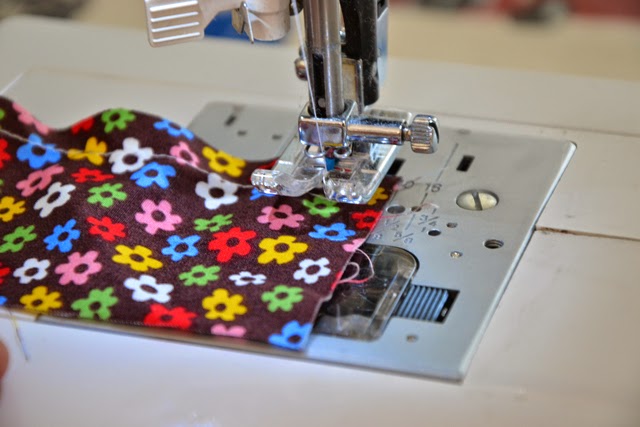
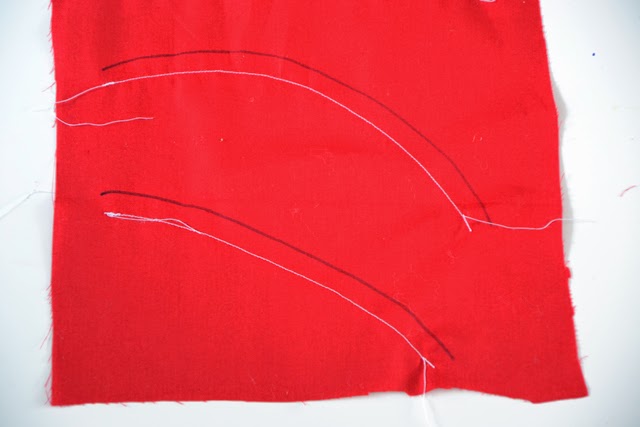
You can draw some lines on your fabric with a dressmaking pen/dressmakers chalk and use these as a guide for sewing straight. I would recommend trying to keep the edge of your foot in line with the line (as above) rather than your actual line of stitching along your line. When we sew a real project we would usually stitch a certain distance away from the edge rather than along a particular line. So as you press down on the foot peddle keep your eyes on the line and try to keep it in line with the edge of the foot.
When you get to the end, use your little button (or your dial) to sew a few stitches in reverse to secure then end, then lift up the foot, pull our your fabric and snip the threads. Tada, your first line of stitches! Now have another practice until you start to be able to do all of that without having to read the instructions.
It is also good fun, and great practice to try and sew along some curved lines too. In the same way draw some curves on your fabric and have a go a sewing next to these, keeping the drawn line in line with the edge of the foot. Don't forget to sew a few reverse stitches at the beginning and the end.
Many beginner projects won't have any curves in them so don't worry if you can't get this right yet. If you come back on Friday I will be going through what a seam is and how to follow it. Zoe x
To Find out more about Sewing School click here.
Labels:
Sew
,
Sewing Machines
,
Sewing School
Subscribe to:
Posts
(
Atom
)