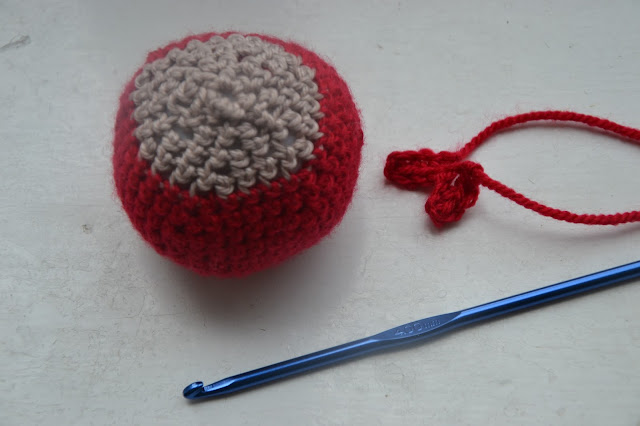
 As much as I enjoying making pretty quilts and clothes for my daughter and I, I also have two sons. My eldest is currently totally obsessed with Angry Birds and so I decided to crochet him a set of Angry Bird characters for his birthday. His birthday isn't until October but when I get an idea I like to get started straight away, plus I have lots of other things to do before then too so why not get going?
I have made up the pattern for 'Red Bird' myself so I thought I would also include this pattern here, just in case any of you ever find yourself needing to make him. I am using the english stitch names and I worked in double crochet (The American Single crochet). I used double knit yarn and a 4mm hook.
First start with the body, this is worked in the round and I started in a pale brown.
Round 1: Ch6 and then ss into the first ch to form a ring
Round 2: 2dc into each st
Round 3: 2dc into next st and then 1dc into next st, rpt until the round is finished
Round 4: 2dc into next st and then 1dc into next 2st, rpt until the round is finished
Round 5: 2dc into next st and then 1dc into next 3st, rpt until the round is finished
At the end of this round cut the brown yarn and tie in some red yarn
Round 6: 2dc into next st and then 1dc into next 4st, rpt until the round is finished
Round 7: 2dc into next st and then 1dc into next 5st, rpt until the round is finished
Round 8: 2dc into next st and then 1dc into next 6st, rpt until the round is finished
Rounds 9-11: dc into each st from the previous round
Round 12: dc 2 st together, dc into next 6dc, rpt
Round 13: dc 2 st together, dc into next 5dc, rpt
Round 14: dc 2 st together, dc into next 4dc, rpt
Round 15: dc 2 st together, dc into next 3dc, rpt
At about this stage you'll need to stuff the body, fill it with some rolled up wadding (batting) or use cotton wool if thats all you have handy.
Round 16: dc 2 st together, dc into next 2dc, rpt
Round 17: dc 2 together, dc into next dc, rpt
Finished the ball by dc crocheting together 2 stitches until it is complete.
Next make the little hair tuft:
ch4, turn, ch1, dc into each st, ch3, turn, ch1, dc into each st.
To make the eyes cut out a pair of eyes from white felt and using your yarn needle embroider on some black pupils.
The eyebrows (or eyebrow) is make simply by chaining 10 in black yarn.
The tail is made by using the black yarn:
Ch3, turn back on yourself then ch 1 and dc into each st from the first row, when you get to the beginning ch3 and again turn back on yourself, ch1 and dc into each st from the second section. When you get back to the beginning again ch3, turn, chain one and dc into each st. You should get the 'T' shape as above.
The nose is made with two triangles, each made with yellow yarn.
Row 1: Ch5, turn,
Row 2: dc into each ch (4 total, don't need to ch1 up to second row, this is how the row gets smaller), turn
Row 3: dc into each dc from row 2 (3 total)
Row 4: dc into each dc from row 3 (2 total)
Row 5: dc into one dc from row 4
(I hope this makes sense, I literally made this bit up having never made triangles before! But this is an accurate description of what I did.)
When you have all these pieces ready, you need to sew them all together. I would suggest sewing the eyes on first, then the beak and eyebrows. When you sew the beak on, try to make them curve around into a mouth shape and sew the eyebrow into a 'V' shape. Finally sew on the tuft of hair (or feathers I guess) and then the tail.
And now you have made your very own red bird and can make the child in your life very happy. I'll share the patterns for the others I make with you when I do those too. Zoe xx
Update: Click here for yellow bird, here for blue bird and here for pig and king pig


Amazing Zoe - just learning how to crochet would be amazing, let alone making an angry bird!
ReplyDelete