Showing posts with label Crochet. Show all posts

Maybelle Flowers: a Fun Flower Pattern

I found this super cute and easy pattern the other day for 'maybelle flowers'. I haven't made many crochet flowers before, I have mostly stuck with granny squares, but I wanted to try something new.

I also wanted to find something to make in those spare 10 minutes I have scattered over the day. The kind when its not long enough to get out the sewing machine or a cutting mat but not short enough to waste altogether.


This is perfect, every time I have a gap like this I can make one or two maybelle flowers. I'm not sure what I will do with them yet but they are pretty cute.

At the moment I am thinking maybe a garland, possibly put them in a frame for my daughters room or perhaps a blanket. What do you think? Zoe

Crochet Angry Birds: Pig and King Pig Free Pattern

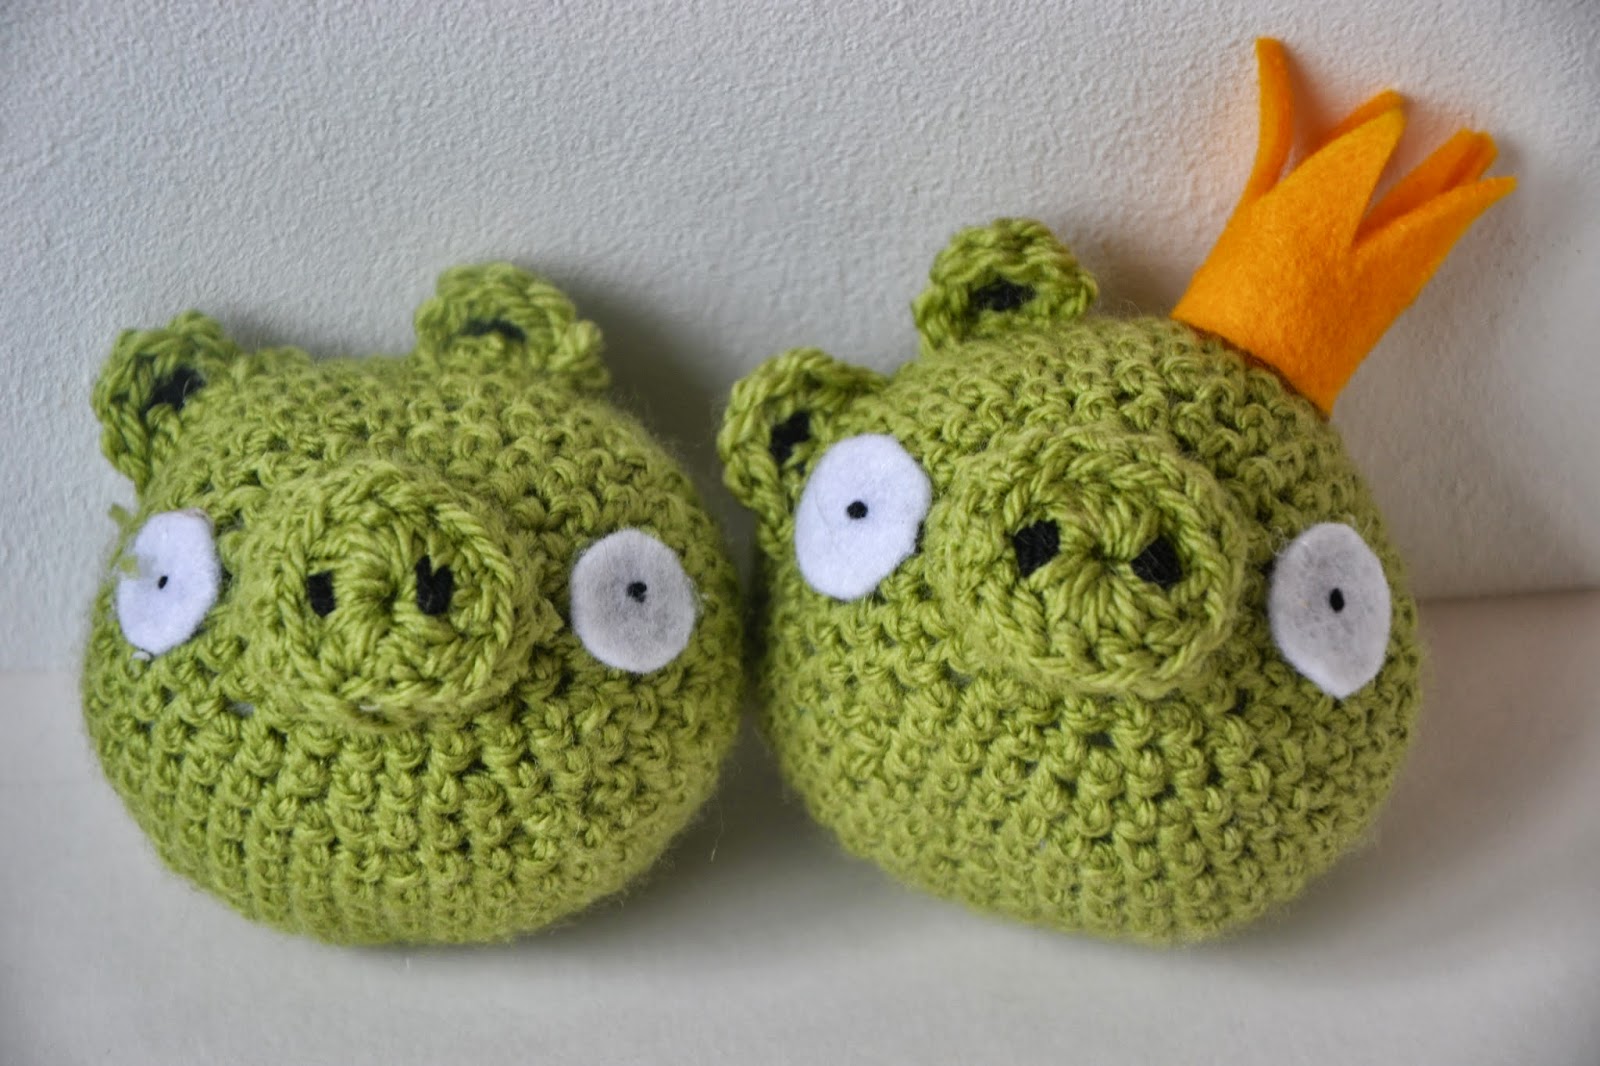
So I have finally made the last in the Crocheted Angry Birds series. I have already made red bird, yellow bird and blue bird, but of course we need some pigs too. For any one who hasn't seen/played angry birds this probably sounds totally nuts but trust me, you need pigs.


 I made two pigs in exactly the same way and then stuck a crown on the top of one to make him King Pig.


The body for them both is exactly the same as red bird except it is green. So take your DK green yarn and a 4.5mm hook then follow this pattern in the round:

Round 1: Ch6 and then ss into the first ch to form a ring
Round 2: 2dc into each st
Round 3: 2dc into next st and then 1dc into next st, rpt until the round is finished
Round 4: 2dc into next st and then 1dc into next 2st, rpt until the round is finished
Round 5: 2dc into next st and then 1dc into next 3st, rpt until the round is finished
Round 6: 2dc into next st and then 1dc into next 4st, rpt until the round is finished
Round 7: 2dc into next st and then 1dc into next 5st, rpt until the round is finished
Round 8: 2dc into next st and then 1dc into next 6st, rpt until the round is finished
Rounds 9-11: dc into each st from the previous round
Round 12: dc 2 st together, dc into next 6dc, rpt
Round 13: dc 2 st together, dc into next 5dc, rpt
Round 14: dc 2 st together, dc into next 4dc, rpt
Round 15: dc 2 st together, dc into next 3dc, rpt
At about this stage you'll need to stuff the body, fill it with some rolled up wadding (batting) or use cotton wool if thats all you have handy.
Round 16: dc 2 st together, dc into next 2dc, rpt
Round 17: dc 2 together, dc into next dc, rpt
Finished the ball by dc crocheting together 2 stitches until it is complete. Make 2 if you want to make 2 pigs.


Then you need to make the nose, this is very simple:

Round 1: ch4, ss into first ch to form a ring
Round 2: ch3, then 11 tc into the ring then ss together the ch3 and the 11th tc
Round 3 and 4: ch2, dc into each st form the round below (11 total) and ss together the 11th dc and the ch2. Make two if you want two pigs.


Then you can make the ears which are also very simple:

ch5, put 4 tc into the 3rd ch and then ss into the 1st ch. Make 2 for each pig.


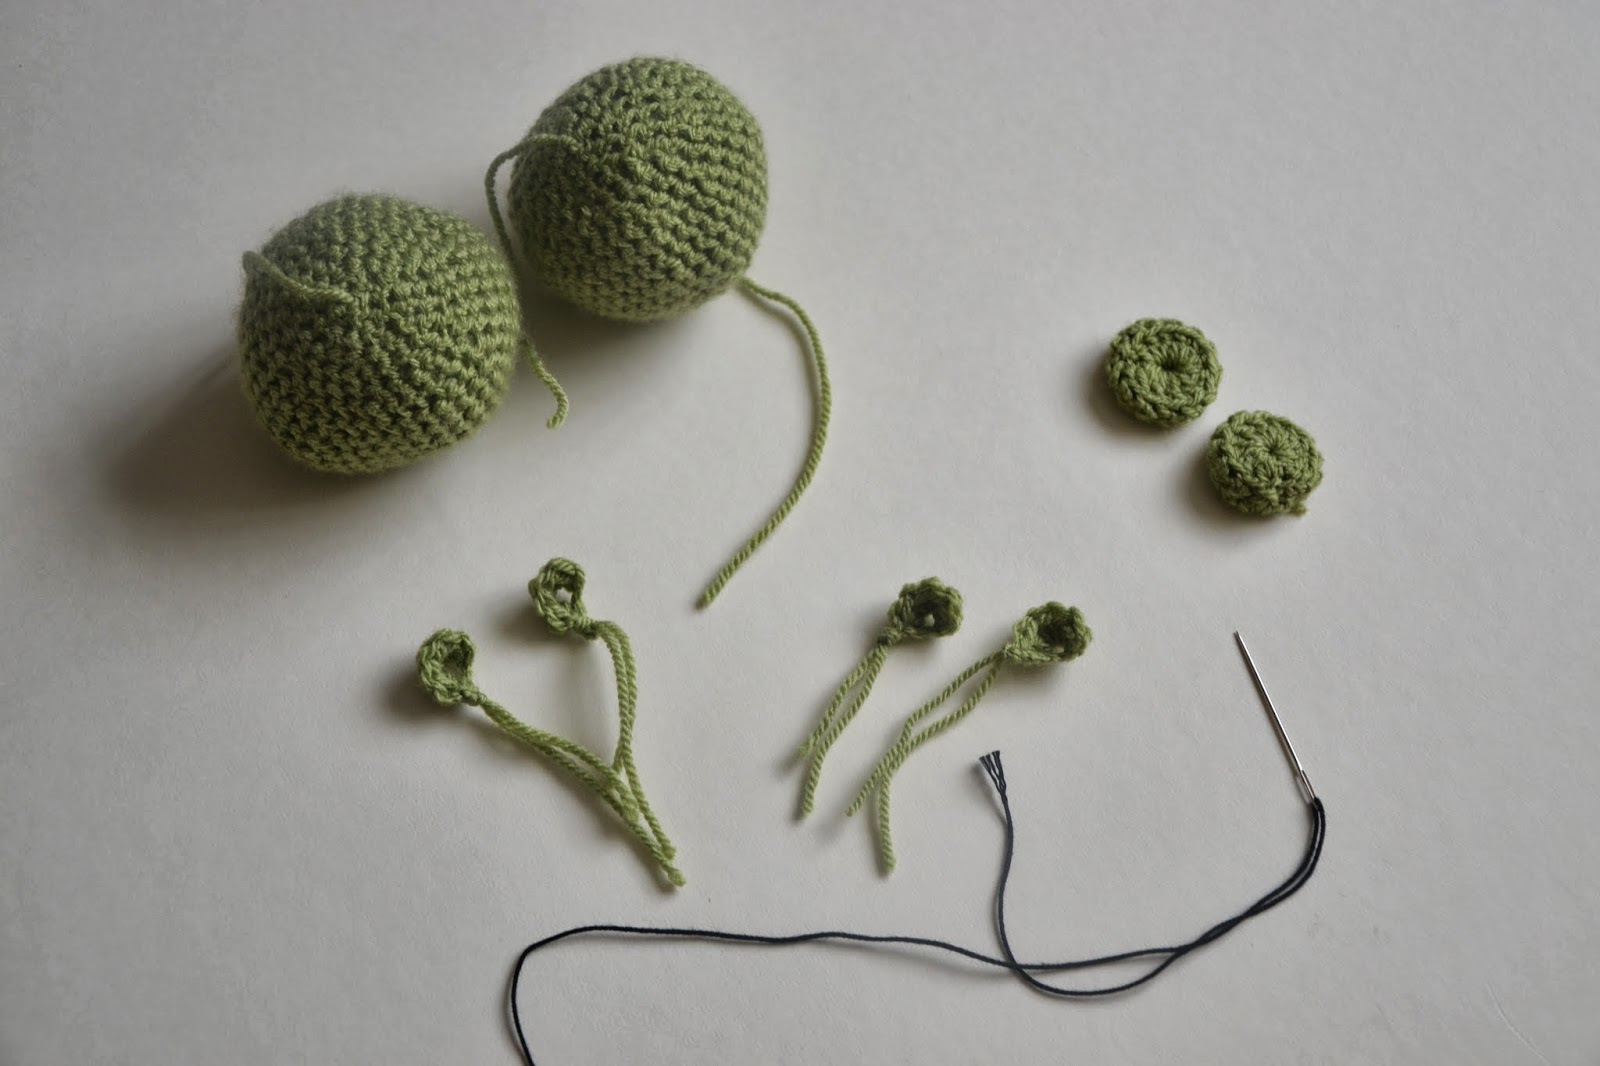
Once you have done these you can get some black yarn and using your yarn needle embroider on a few details, so the blacks in the ears and the nostrils. I also made some eyebrows out of the black yarn by simply chaining 4 but when I came to sewing these on I didn't think they looked right so I left them off.


But now all you need to do its stitch it all together. I put the ears of one pig right over to one side so I could also glue a crown on, this crown was just cut out of felt and then hot glued together and hot glued to the pig. One of the good things about making the pigs is they are all a bit wonky on the game so even if you don't get them perfect they'll probably look like the ones in the game.


Now I just need to wrap them up and hide them until birthday time. I always get really excited about giving gifts, especially handmade ones, so I hope I can wait until his birthday. Hehe. Zoe xx

Crochet Angry Birds: Yellow Bird

With my sons birthday fast approaching (is it really October tomorrow?) I have been finishing of the angry birds that I will give him (See here and here for the red and blue birds). This is the final bird I am making but I will be making some piggies too, you can't play angry birds without the pigs. To make the yellow bird first you need to crochet two diamonds. So using your yellow dk yarn and a 4mm hook follow this pattern:

Ch3, DC into the first chain, turn.
Ch2, 2DC into the next st, turn.
Ch2, 2DC into the next stitch and then 1 DC into the subsequent stitch, turn.
Ch2, 2DC into the next stitch and then 1 DC into the subsequent stitches, turn.

Continue in this manner until you have a triangle (half the diamond) that you think is large enough. My widest row had 14DC's altogether. Now you need to start making the diamond smaller again. So instead of putting 2 DC into the first stitch, you miss it out and just do one DC into each of the subsequent stitches. When you have only 2 DC's in the row turn and then ch2 and ss into the other DC to make it a nice pointy diamond.

Make two of these. Then you need to stitch them together to make a pyramid. Put them together like this:

And then stitch these sides together, continue round until you have only one side left to stitch, stuff with wadding, then stitch together the last edges. Then you should have a yellow pyramid that looks like this:

After making this body you need to make a nose, to do this find a slightly darker yellow yarn or an orange yarn and follow this pattern:

Ch8, ss into the first ch to form a ring,
Ch2 and then DC into the next stitch, 
Skip a stitch and DC into the next 2 stitches. Repeat this step until you have made a little cone.

When you have made these, you need to make the hair and tail. These are the same as each other so you get your black yarn and make two of these:

Ch6, turn, skip the first 2ch (these are the first DC) and DC into the other 4 stitches, this returns you to the beginning.
Going out from your starting stitch repeat the first step: Ch6, turn, skip the first 2ch (these are the first DC) and DC into the other 4 stitches. Then repeat this again : Ch6, turn, skip the first 2ch (these are the first DC) and DC into the other 4 stitches.

I then tied together the ends. You can see in the picture above the top one is tied and the bottom one isn't and by tying them it gave the shape I was after. Then you stitch the hair and beak onto the bird.

I then made the eyes and the eyebrows out of felt and stitched these on too. So now I have three birds complete:

I will be making the pigs soon too, hopefully by the end of the week so come back if you want to see those. Zoe xx

Make a Crochet Circle Cushion


A few weeks ago I shared with you my pattern for crocheting a circle pattern. Now you could easily use this pattern to make some doilies and just leave them as they are but I wanted to turn mine into a cushion. To to this I first of al put the crochet circle onto some fabric and drew around it the size of circle that I would need for the cushion:


 Then I machine stitched along the drawn line leaving a small space for stuffing the cushion:

I turned the cushion inside out (or outside out). Then I stuffed the cushion with some stuffing I had taken out of an old cushion we no longer use. I then hand stitched the opening shut and hand stitched the crochet to the cushion.


And hey presto a cushion! This will eventually sit on our bed but I have to finish the octagons quilt first. Nearly there though. Zoe xx

Crocheted Angry Birds: Blue Bird

As you saw a few weeks ago I have been working on some crocheted angry birds for my eldest son whose birthday is in October. I already shared with you the red bird and today I finished the blue bird. Well actually I made three blue birds because they are only little and quick and also because in the game when you make blue bird fly if you tap the screen he splits into three.

Making this bird if very similar to making the red bird so I won't go through all the instructions. The bird itself is smaller than red bird though so I will write the pattern for this here. So use a DK blue yarn and a 4.0mm crochet hook (english stitch terms used of course.)

Round 1: ch6, ss into first st to form a ring
Round 2: 2 dc into each st (12 total)
Round 3: 2 dc into 1 st, then 1 dc into next rot all the way around (18 total)
Round 4: 2dc into 1 st then 1 dc into next 2 st, rpt all the way around (24 total)
Round 5-8: 1dc into each stitch. After this round stuff your angry bird with wadding (batting) or cotton wool if thats all you have handy.
Round 9: dc 2 st together then 1dc into next 2 (total 18)
Round 10: dc 2 st together then 1 dc into next st (total 12)
Continue to dc two st together until you come to the end.

When you have done this tie in your ends. You can make the tail and the 'hair' in the same way as these instructions and the eyes are again made out of felt. Blue bird in the game has little bags under his eyes so I tried this on one, he didn't look quite how I hoped and then I lost my brown felt somewhere so I didn't do the same with the other two birds but you can if you'd like. Just stitch on two little brown triangles of felt that slightly overlap the eyes.

The nose is also slightly different to red bird. Using your yellow yarn you ch2, then 2 dc into the first ch, then 2 dc into each of these st. then 2 dc into the each of these st. Continue this until you think you cone shapes nose is large enough, I think I did 4 rounds.

When you have done that stitch all the pieces together:


Then make 2 more:


So now you have the red bird and the blue birds complete, next I will make the yellow bird. Have fun. Zoe xx

Update: click here for yellow bird and here for pig and king pig.

Crochet A Circle Cushion With Free Pattern

I am on a bit of a crochet kick at the moment and my latest completed project is this. I know it looks just like a doily and that is sort of the point but it is going to be a cushion soon so I wanted to make it from scratch rather than just just a doily and dye it.

To make this I used DK yarn and my trusty 4.5mm crochet hook. I made it up as I went along while trying to make sure I had the correct number of stitches in each round and I have done my best to write down for you what I have done. As usual I am writing with the english stitch names.


First ch6, ss into the first ch to form a ring.
Round 1: ch3 (counts as first tc) then 14 tc into the ring (15 total) and join with ss to form a circle.
Round 2: ch3 then 2 tc into each st (30 total) and join with ss.
Round 3: ch3 and put 2 more tc into the same st. Then miss a st and put 3 tc into the next st. Continue making cluster of 3 tc's all the way around until you can ss into the first one. (total 45 tc OR 15 clusters)
Round 4: ch3 and then 2tc into the space followed by ch 1, then put 3 tc's into each space between clusters from round 3 with 1 chain in between. Ss together the circle. (total 45 tc and 15 ch OR 15 clusters with ch 1 in between.)
Round 5: ch2, then dc into each tc below and 2 dc into each space. Ss together.
Round 6: ch3 and tc into same st then tc into 4 st, followed by 2tc into next stitch. Repeat this all the way round and ss together. 
Round 7: ch3 and tc into same st then tc into 3st followed by 2tc into next st. Ss together. 
Round 8: to make the scalloped edge count along to the 3rd stitch from where your hook is, in this stitch put 5 tc's, then count along to the 3rd stitch from here and ss into this stitch. This makes your first 'scallop'. Repeat this all the way around. As you get near the end check you have enough stitches left to make whole 'scallops' and if not you make need to count along 2 or 4 stitches for a few scallops to make sure they fill the space but mine worked out perfectly so yours should too.

The outer rows of crochet are slightly more complicated and sadly did start to become slightly 'wobbly' near the end so I may have no counted correctly.

Round 9: Once you have finished the row of scallops you need to ss along the first 3 stitches of the first scallop so that your hook is joined in through the top of one scallop instead of the gap between two. When you get to here you need to chain 7 and ss into the top stitch of the next scallop. Continue to ch7 then ss into the next scallop all the way around.
Round 10: ch3, 8tc into the space and then tc into the stitch at the top of the next scallop. Repeat this all the way around and then ss together.
Round 11: ch 2, then 1 dc into each of the next 4 stitch's. 2dc  into the next stitch (the one at the top of the bump) then 1dc into the next 8 stitches until you get to the top of the next bump and put 2dc into here. repeat this all the way around.
Round 12: This round we are attempting to get rid of the wave that was put in when we did the scallops. So you are currently at the bottom of a wave, so ch3 (counts as first tc as usual) then put 2 tc into the same stitch, ch1 and then 2dc into the stitch that is 'this side' of the bump, ch1 and then 2 dc into the stitch that is 'that side' of the bump, ch1 and put 3 tc into the stitch in between the two bumps. This makes a sort of 'reverse wave' and fills in the gaps. Do this all the way around until you reach the first tc and ss together.
Round 13: This round is made up of clusters of 3tc into the spaces below. So ch3, then do two more tc into the same space. The sequence on this round goes 3tc's into space, ch1, 3 tc's into next space, 3tc's into next space, ch1, 3 tc's into next space. And continue this all the way around. I.e you need to do ch in between every one cluster of 3tc's. When you finish the round ss together.
Round 14: This last round is very similar to round 8. From where your hook is, count to the 3rd stitch and then do 6tc's into this space. Then count to the 3rd stitch along from here and ss into this stitch. Repeat this all the way around until you get back to the beginning and you're finished.

I hope you find this pattern useful (for personal use only though) and as usual feel free to ask if it's unclear. Soon I'll show you the finished cushion. Zoe xx

Crocheted Angry Birds: Red Bird

As much as I enjoying making pretty quilts and clothes for my daughter and I, I also have two sons. My eldest is currently totally obsessed with Angry Birds and so I decided to crochet him a set of Angry Bird characters for his birthday. His birthday isn't until October but when I get an idea I like to get started straight away, plus I have lots of other things to do before then too so why not get going?

I have made up the pattern for 'Red Bird' myself so I thought I would also include this pattern here, just in case any of you ever find yourself needing to make him. I am using the english stitch names and I worked in double crochet (The American Single crochet). I used double knit yarn and a 4mm hook.

First start with the body, this is worked in the round and I started in a pale brown.
Round 1: Ch6 and then ss into the first ch to form a ring
Round 2: 2dc into each st
Round 3: 2dc into next st and then 1dc into next st, rpt until the round is finished
Round 4: 2dc into next st and then 1dc into next 2st, rpt until the round is finished
Round 5: 2dc into next st and then 1dc into next 3st, rpt until the round is finished
At the end of this round cut the brown yarn and tie in some red yarn
Round 6: 2dc into next st and then 1dc into next 4st, rpt until the round is finished
Round 7: 2dc into next st and then 1dc into next 5st, rpt until the round is finished
Round 8: 2dc into next st and then 1dc into next 6st, rpt until the round is finished


Rounds 9-11: dc into each st from the previous round
Round 12: dc 2 st together, dc into next 6dc, rpt
Round 13: dc 2 st together, dc into next 5dc, rpt
Round 14: dc 2 st together, dc into next 4dc, rpt
Round 15: dc 2 st together, dc into next 3dc, rpt
At about this stage you'll need to stuff the body, fill it with some rolled up wadding (batting) or use cotton wool if thats all you have handy.
Round 16: dc 2 st together, dc into next 2dc, rpt
Round 17: dc 2 together, dc into next dc, rpt
Finished the ball by dc crocheting together 2 stitches until it is complete.


Next make the little hair tuft:
ch4, turn, ch1, dc into each st, ch3, turn, ch1, dc into each st.

To make the eyes cut out a pair of eyes from white felt and using your yarn needle embroider on some black pupils.


The eyebrows (or eyebrow) is make simply by chaining 10 in black yarn.

The tail is made by using the black yarn:
Ch3, turn back on yourself then ch 1 and dc into each st from the first row, when you get to the beginning ch3 and again turn back on yourself, ch1 and dc into each st from the second section. When you get back to the beginning again ch3, turn, chain one and dc into each st. You should get the 'T' shape as above.

The nose is made with two triangles, each made with yellow yarn.
Row 1: Ch5, turn,
Row 2: dc into each ch (4 total, don't need to ch1 up to second row, this is how the row gets smaller), turn
Row 3: dc into each dc from row 2 (3 total)
Row 4: dc into each dc from row 3 (2 total)
Row 5: dc into one dc from row 4
(I hope this makes sense, I literally made this bit up having never made triangles before! But this is an accurate description of what I did.)

 When you have all these pieces ready, you need to sew them all together. I would suggest sewing the eyes on first, then the beak and eyebrows. When you sew the beak on, try to make them curve around into a mouth shape and sew the eyebrow into a 'V' shape. Finally sew on the tuft of hair (or feathers I guess) and then the tail.


And now you have made your very own red bird and can make the child in your life very happy. I'll share the patterns for the others I make with you when I do those too. Zoe xx

Update: Click here for yellow bird, here for blue bird and here for pig and king pig

Cassie's Crocheted Camera Case

Moss Stitch Crocheted Camera Case
I have mentioned to you before that my sister Cassie is a fellow crafter and today I am handing over to her so she can tell you about her latest project:

I recently crocheted myself a cover for our iPad. I'm not sure how much protection it actually offers but it looks jolly pretty. My mum seemed to think it was really funny, that something so high tech would be placed in a crocheted case. Turned out she liked it really though as last week she text me the dimensions of her new point and shoot camera asking if I would make a case for that.

Moss Stitch Crocheted Camera Case
Being much smaller than an iPad I knew it was a quick project for one evening and I decided I'd have a go at a stitch I haven't done before. It's called Moss stitch and it's super simple for anyone who has ever crocheted. You can find instructions here. I had chosen 3 colours and as I hate having to sew in lots of ends I decided to just work with the three yarns attached. I had to untwist things a couple of times! You can use as many colours as you like and fasten off at the end of each row if you choose. I added a popper to close and a button for decoration.

Moss Stitch Crocheted Camera Case
I really like the effect of the moss stitch and hope my mum does too but most importantly, I hope it fits the camera!! Cassie. xoxo

Thanks Cassie for sharing this cute case with us, and obviously it was a perfect fit for the camera. We hope to hear some more from you and your crafting soon. Zoe xx

Crochet Granny Squares Soduku Blanket

I've been making a granny square blanket for a while. And now I'm finished! It started out with just 5 little squares:
I 'instagrammed' my progress which you can see above. This is my first proper crochet project (I like to start big) and I have enjoyed the process of making it. It is a very therapeutic craft so I encourage you to learn. You can learn the basic stitches here and there is also a pattern for the 'granny square' just as I have made for my blanket.
 And now it's finished. If you're interested the geek in me wanted to make a blanket with granny squares in 12 different colour combinations. I wanted to have one of each colour in each row and one in each column, hence the soduku blanket. This is the grid I followed to make sure it worked out right:
And I'm delighted with the results. It looks random and gives an even spread of colour but I know it has a hidden pattern. 
I think it will stay here for now, draped over this chair waiting for winter. Zoe xx

Tunisian Crochet Hook Holder


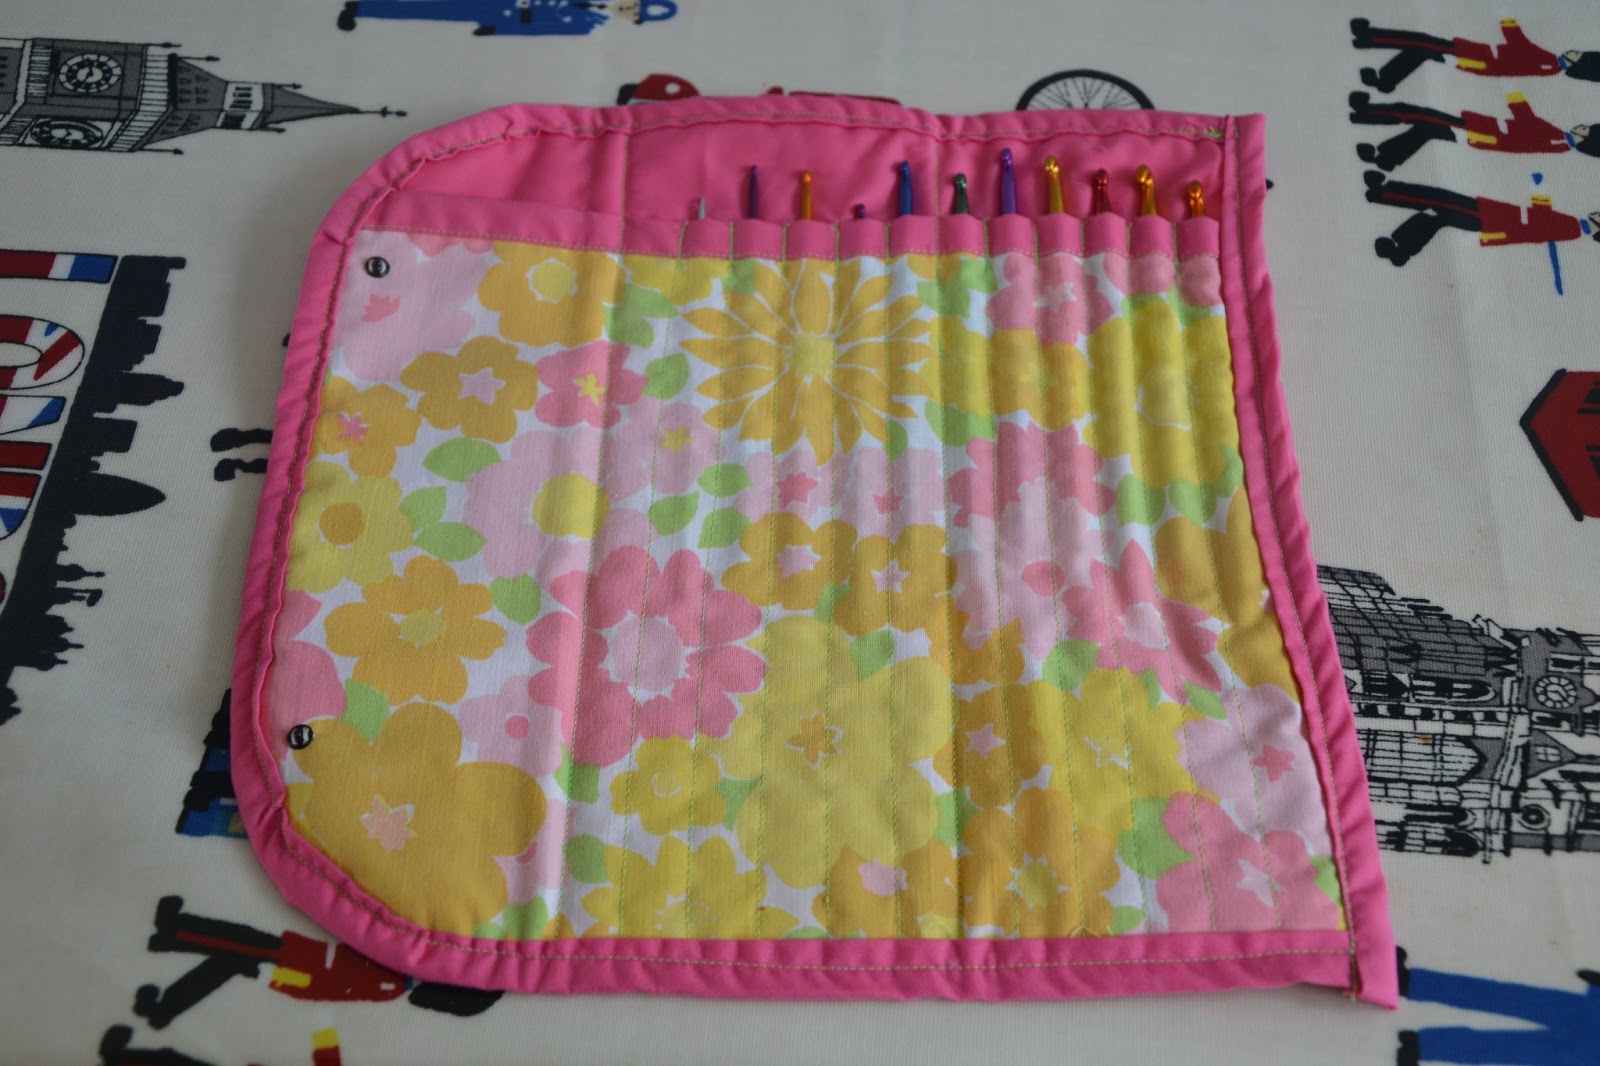
This week is my Sisters birthday. She is a fellow 'crafter' and has recently invested in a set of Tunisian crochet hooks. I decided to make her a case to keep her hooks in. This is what I did:
First I chose a fat quarter of this vintage fabric to be the main fabric and a coordinating plain fabric for the lining and binding. 
The hooks are just less than 30cm long so I also made it 30cm tall. I cut a 30x30cm square from both fabrics and a 20cm square from the main fabric.
 I needed her case to be long enough for 12 hooks and I wanted 1.5cm width for each 'hook pocket'. I also needed an extra 10cm to make a flap to close it. Therefore I needed the case to be 30cm wide (12x1.5+10).
I also needed a 30x30cm square of wadding (batting). I didnt have quite the right size in my thinnest wadding so I made it up from two rectangles which hasnt affected the final result but it would be easier to cut one square.
I then made a 30cm peice of bias binding and stitched this along one long edge of the rectangle of the main fabric. 
I then used a dressmakers pen and my quilters ruler to draw 13 lines on the rectangle. The first line was about 1cm in from the right (if the bias binding was at the top) and then marked 12 more lines each 1.5cm to the left of the previous one.
I then pinned this rectangle to the square of the plain fabric, lining up the bottom of the rectangle with one edge of the plain square (should have photographed this, sorry!) I then stitched along all the lines except the 1st, 7th and 13th line. To make sure the 'hook pockets' are strong I stitched forward and back along the very top of the pocket where the bias binding is. The picture below shows this better.
I then trimmed the threads.
I then lay the large square of main fabric face down on the mat. I lay the wadding on top, lining up the edges. then I lay the pockets on top of this face up.
Then I stitched along the 1st, 7th and 13th lines from the very top to the bottom.
I then curved round the corners on the left hand side, I made it symmetrical by folding these in half and doing both together but I did it freehand.
I then stitched binding around the curved edge. I was lazy and didn't actually make 'bias' binding so that's why it doesn't lie flat but after ironing it it looked a little better.
I then stitched another piice of binding down the remaining edges, tucking in the corners as I went. I trimmed any remaining threads and washed off the dressmakers pen marks. 
I then hand stitched in some poppers and voila:
I hope she likes it! Zoe xx

P.S She did.


Related Posts Plugin for WordPress, Blogger...