Showing posts with label quilt. Show all posts

Sewing School // What You Need To Learn To Sew (no matter how small your budget)

Welcome to part one of Sewing School! (Find out more here) Before you learn to sew there are a few things you will need. There are probably a few people out there who are worried about learning to sew because they think they can't afford it. Well here is my list of things you need, suitable for almost any budget.

The Absolute Essentials (and how much to spend)
This part of my 'what you need list' is a list of things to have access to for a good starter kit for sewing. You can do some sewing with only half the list but most projects, and what I will cover in sewing school, will need all these things. But don't worry yet, its not going to break the bank.

1. Some Fabric To Sew: Fabric can get kind of expensive, and you may have your eye on something already but don't go forking out a fortune just yet. If you are just learning its a good idea to save the fancy and expensive fabric until another day. A good fabric to start on would be a non-stretchy cotton. Something like an old pillow case or sheet. You probably have one of these lurking at the back of a cupboard somewhere, if not an old top or skirt will do. Or if you really can't find any of these pop down to a charity shop and buy something there for a few pounds. To start with we are just going to be learning to use the machine so it really doesn't matter what it looks like. Cost: Free! (or a very small amount)

2. Something To Sew With, i.e a sewing machine: Arghhh, this is the part you're worried about, buying a sewing machine. Well fear not my friend, while I would recommend you get yourself a sewing machine if you are serious about learning to sew you can almost guarantee that you have a friend/relative/neighbour who has a sewing machine in their cupboard that isn't being used. Chances are they wouldn't mind lending it to you either. The best part about this, you can ask them how to use it when you pick it up so you don't even have to bother reading the sewing machine manual. Winner. If you start to enjoy sewing you can ask for a machine for your Birthday or Christmas or start saving, they really aren't too expensive. Cost: Free!


3. Something to Cut Your Fabric with: Fabric needs an extra sharp blade to cut through it. In the above photo you can see a few different options available to you. From the left we have dressmaking scissors, these are brilliant for cutting your fabric into the right shape and size pieces that you would need for most sewing projects. The pink pair are called embroidery scissors. They are good for snipping end of threads or cutting into seams (more on this during sewing school) but its virtually impossible to cut out a neat shape with them so you would still need some dressmaking scissors. The third pair along, the smaller black pair, is another kind of fabric scissors. They are cheaper and smaller than dressmaking scissors so can be good for small projects and if you are sewing on the go but aren't as easy to use. The last thing, the yellow one, is called a rotary cutter. If you are thinking of learning to quilt more than make clothes then investing in a rotary cutter will make your life much easier. They can be used in dressmaking too but can be a little more tricky than the scissors for cutting out the curved edges. The cost varies depending on which kind you buy but you could buy any one of these for less than £10. Cost £10


3. Some Thread: When you get serious about sewing you will probably want to buy yourself some thread to match each fabric that you buy. For now, while you just practice on your machine, you can use anything. The kind person that leant you the sewing machine might even let you use whats already on the machine, but if not head down to a local haberdashery and buy some. If you buy some white or black chances are you will use it up eventually. Before you pay just check with the shop assistant that the one you have chosen is compatible with sewing machines, some aren't and they end up getting all tangled up. Been there, done that. Cost: £1-2. (or less)

5. Hand Sewing Needles: While most projects do use a sewing machine, they quite often involve some hand sewing to finish them off. While you are in your haberdashery buying thread, buy yourself some needles too. Even if you aren't interested in sewing after trying it out you will probably need these one day to fix a hole, sew a hem or attach a name label to your kids PE kit. Cost: £1-2

6. Seam Ripper: Trust me you need one of these. Its the red thing with a see though lid in the photo above. This handy little divice with help you undo any mistakes you make. I still use mine lot's and I used it most when I was a beginner. Plus this is handy even if all you ever do is learn to hem your trousers. Cost: £3-4

7. Pins: The Last of your essentials that you need to buy are pins. Technically you could use masking tape instead of pins to hold two pieces of fabric together (or a pattern to your fabric) but pins will come in handy in other ways too as you learn to sew more and more. I have shown safety pins in the photo which can be useful but what is more useful are straight pins which are also called dressmaking pins. They are much quicker to use so when you are using your sewing machine you can quickly slip them out before the sewing machine needle hits them. Cost: £1-2

Other thing you will need but probably already have:
Pencil
Large paper or baking parchment
Paper scissors
Iron and an Ironing board
Ruler (the longer the better)
Tape measure (the long flexible kind, not the tool box kind)

Or buy a travel sewing kit and get a few of the listed items above at once.
A travel sewing kit won't have everything you need but it may cover several of the things mentioned above and therefore save you even more money by buying it all together. My sewing tin (shown in the photo) contains thread, needles, seam ripper, embroidery scissors, a thimble, buttons, pins, needle threader and a measuring tape! Check the contents before you buy one as they aren't always the same, but you could be saving yourself a few pennies and buying a nice tin or box to keep it in. Cost £5-10 (could be more if you get a really fancy one)

These few items are enough to help you learn to use a sewing machine and get to grips with the basics. I think the totally cost could be as little as £10 if you get a good travel sewing kit and invest in some dressmaking scissors. Each time you start a new project there will probably be a list of things you need for that particular project but the things in this list will be used almost every time you sew. In the next session I'll go through setting up your sewing machine with you before we can get started with sewing. See you soon, Zoe xx

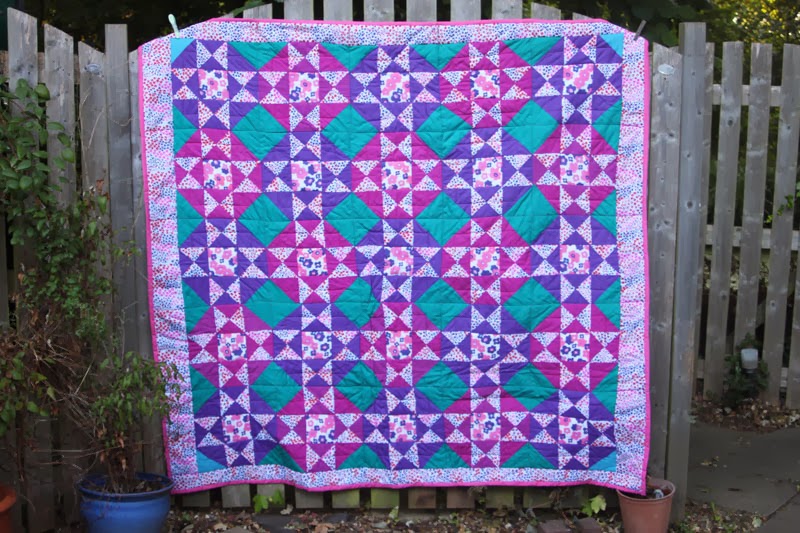
Indian Stars Quilt

This is the third quilt I ever made, I thought I would share it with you. You can see the first here and some day I will show you the second. I made this one for my mum. She went on a trip to india a few years ago and bought the bright coloured fabric for me to sew up into a quilt. I bought the floral fabrics to help break up the colour a little and to make it large enough for a double quilt.

Each block is a star block, like the large star on the star pinwheel baby quilt I showed you recently. The corners of every block are green so when you put them together it looks like there are green squares in between each star.

For the back I used more floral fabric and plain pink for the binding. I won't be sharing full instructions for this one but if you are thinking of making a quilt and don't know where to start the octagons quilts is a good place to look. Zoe x

Star Pinwheel Baby Quilt Part 3: Quilting


By now you will have made your quilt top, quilt back and your quilt sandwich (if not have a look here and here). Now it is time to quilt your quilt. This is the process of stitching together your three layers across the whole quilt. You will need to feed all three layers of your quilt into the machine at once. For this quilt I have gone with a very simple design.


You may be able to see from the above photo that I have simply stitched 'in the ditch' for most of the quilt. This means I have stitched along the seams between one fabric and the next. This common method of quilting is very simple but effective because it really complements the patchwork design. The photo below gives you a better idea of how I made this work on this particular quilt.

In addition to stitching in the ditch I have also sewn diagonal lines between each diagonal seam. This extra quilting gives more texture to the quilt and makes it feel more complete. For another idea of how you could quilt yours have a look at my baby quilts for a boy and a girls and you can see free motion quilting. This would also look lovely on this quilt but requires a little more time and practice. Since this quilt is designed for beginners I wanted to stick to something much more simple. If you there is anything you don't under stand or if you have a question, leave a comment and I will try and help.

There is only one more stage to go with this series so come back tomorrow for a tutorial on binding. Zoe x

Star Pinwheel Baby Quilt Part 2: Quilt Back


Yesterday I started sharing instructions to make a star pinwheel baby quilt and we made the star quilt top. Now to make a pinwheel for the back of the quilt. You may remember we cut out fat quarters into triangles like this:

We used the smaller triangles on the quilt top, for the back we need the larger triangles. Lay these out to form a pinwheel:
As you can see in the above picture a pin wheel is a square made up of triangles where the dark and light colours alternate to form a 'pinwheel' pattern. In a traditional quilt a pinwheel block is made up of only two fabrics but we are just making one giant one for the back of this quilt so its a little different. Tou need to take the darker triangles and lie them on top of the light triangle that they are next to with right sides together:

You can now take each pair of triangles over to your machine and stitch along the longest side, just as we did for the quilt top with a 6mm (1/4") seam allowance. Then you can press the seem to the dark side and this gives you four squares:

Be careful in all these steps to make sure you are stitching along the correct edge, you can mark it with a pin if you're unsure. Next you stitch the top two squares together to make a row and the bottom two squares together to make a second row using a 6mm (1/4") seam allowance and press the seams again to the dark side.

Then finally you take the top row, lie it on top of the bottom row with right sides together and stitch these two rows together keeping that 6mm (1/4") seam allowance. Press this final seam to one side, it doesn't matter too much which way.


Now you have made your quilt back you can start on your quilt sandwich. You can find instructions on how to do this here from my vintage sheets octagons quilt here. You will need your quilt top star, the quilt back pinwheel and 1m square of wadding. If you have any questions leave a comment and I will try and answer. Come back tomorrow for the quilting stage. Zoe x

Star Pinwheel Baby Quilt Part 1: Quilt Top


I've been waiting for ages to show you this quilt. I made it for my sister-in-laws baby but it was two weeks late so I have had to keep it quiet for much longer than I thought. I wanted to make a quilt for her baby and I came up with this idea when trying to devise a quilt that would be really easy for any one hoping to learn to sew.

This quilt is so simple to make, if you have ever considered making one try this because it's a great beginners quilt. You don't even need to buy a cutting mat and rotary cutter which are normally pretty essential for speedy quilt making. So if you know some one who is having a baby soon, or maybe your are? Or maybe you just want something to pop over your knee on a chilly evening, you should make one of these quilts. It's super easy and also inexpensive as far as quilts go.  Just follow along this week and you will have a quilt. Sorted.


You Will Need:
8 Fat Quarters, 4 dark and 4 light (any colour will do, or you could have 2 contrasting colours instead of dark and light)
Fabric Scissors (You can use a rotary cutter if you have one of course)
Sewing Machine
Thread
Wadding (Batting)
You might need extra fabric for binding depending on the size of your fat quarters

Make the Quilt Top
The quilt top, or the star, is the first thing you will need to make. Take a fat quarter and fold the corner up so that the side lines up with the top as shown (1). Then you need to cut off any excess again as shown (2). This leaves you with an exact square. Some fat quarters are cut as squares but normally they are cut from a metre of fabric (sometimes a yard) from the roll and then this metre is cut into quarters to make the 'fat quarters'. So unless the fabric was originally 1 metre across then you will have some extra. Save this extra piece for your binding (part 4).


Now that you have a square shape you need to carefully cut it into these 5 triangles:


To do this simply cut the square in half along the diagonal, then cut one of these triangles in half again, and finally cut these two smaller triangles in half again. Repeat with all your fat quarters until you have 8 large triangles and 32 small triangles.


Now you need to take your 32 small triangles and pair them up. Make 8 pairs with one dark and one light triangle,  4 pairs with both triangles from your darker coloured fabrics and 4 pairs with both triangles the lighter coloured fabrics. Then put each pair with 'right sides together' and with the long side of the triangles lined up.


Now you need to stitch together each pair of triangles along this longer edge leaving a 6mm (1/4") seam allowance. Then open out the triangles and you will see you have made them into squares, press the seams to one side, if you can press towards to dark side.


Next you can lay your squares out on the floor and arrange them into the star shape. You can move them around until you are satisfied with how they look. Then collect together each row of squares from left to right into a pile. With your sewing machine stitch squares together to make rows, make sure you have each square up the right way so that you keep your star shape. Sew with the squares right sides together and with a 6mm (1/4") seam allowance. Then press your seems to one side, again if possible towards the dark side.


Finally stitch the rows together, again with right sides together and a 6mm seam allowance. You may need to lay your rows out on the floor again to make sure you are going to stitch them in the right order.


And that's it! You have made a quilt top and it wasn't so hard was it? Well if you struggled with anything then let me know in the comments and I will see if I can help. I'll share with you the next stage next Tomorrow. Zoe x

Find the other 3 parts here:
Quilt Back
Quilting
Binding and Finishing

Newly Decorated Bedroom


When we moved into our house 3 years ago I wanted it to be really colourful, so we painted the walls really bright colours. It didn't take me long to realise that bright colours didn't have to be all over the walls to have a brightly coloured house and that these bright colours were not creating the restful atmosphere I needed. Luckily one of my favourite things to do is redecorate and the next room up for a change was our bedroom.


I am not sure I am ever finished with decorating and I haven't decided yet what lighting to have so these are the pictures before we change the lights. The colour on the walls is a much lighter blue than the original colour and now the most vibrant colour comes form our quilt. All the furniture and decor in this room is either second hand or homemade, or sometimes a mixture of the two. Our first house was almost entirely furnished with second hand furniture any way because we couldn't afford to buy the new things that we wanted, but over time I have built up quite a collection of second hand goods that I genuinely love. The two 'bedside tables' are a perfect example of this.


My Bedside table is also my desk. Our 3 bed house is quite cosy for the 5 of us so we have to make our rooms multifunctional and our bedroom is no exception. I showed you the bed that I upcycled and I have also redone a few other bits of furniture in here. We have left a few pieces exactly as we inherited them like these wardrobes. One of them we were actually given from my very generous in-laws when they moved house, the other we bought on eBay.


I saw this mirror at a car boot and thought it would be perfect in the room with the Octagons Quilt. You can see these flowers on my very first post ever which I made after seeing this Pin (one of my very first ever pins) planning to put them in my new bedroom so you can tell how long this project has been going on for. I will share with you the other projects for the room over the next few weeks. Time to plan the next room to decorate. Zoe xx

Baby Quilts For A Boy And A Girl

Baby Boy and Baby Girls Quilts
My sister Cassie, whom you met last week when she made this crocheted camera case, has just had a baby! Hooray! Until this bundle of joy popped its head out (if only it were that easy) I didn't know the gender of the baby, in fact no one did. So to be ultra prepared I decided to make two quilts.

Baby Boy and Baby Girls Quilts FoldedNow these aren't crib sized quilts, I think crib size is too big for a baby to actually use, so I made them a bit smaller. To me when you go to the trouble of making something by hand it should be useful rather than just look pretty, so hopefully this will be much more versatile and therefore practical.

Baby Girls Quilt


The girls quilt was made from a bundle of fat quarters cut into 12cm squares and stitched into a 'checkerboard' style pattern with a plain white in between. The back is also white. If you have never made a quilt before this is a perfect one to start with.

Baby Boy Quilt


The boys quilt also has 12cm squares but these are randomly spread across the quilt. This one is backed with the stripy fabric used in some of the patches.

Baby quilt backs

The binding is made from leftover fabric from the front patches. This is the first time I have successfully managed to 'free motion quilt' a quilt and I am really pleased with how it came out. I had to try this a few times over to make it work but I think I have finally got the hang of it and it does give a really lovely effect.

Free Motion Quilting on Baby Girls Quilt


I loved how quick these were to make, I have only made double quilts before so these were very quick in comparison.

Baby wrapped up in the Girls Quilt


So here my is newest neice wrapped up snuggly in her blanket, cute or what? The only question is, what do I do with the other one? Zoe xx

Vintage Sheets Octagons Quilt: Binding

Yey its time for the binding! This is one of the fun parts of quilt making because once its done the quilt is finished too. So I am going to go through how to make 'french binding.' I used this technique for the first time on these baby quilts and I found it really easy, it had a good finish and its all done in one piece. To make the binding simply cut some long strips of fabric about 10cm wide. 

You can use some leftover bits of fabric, a complementary fabric or whatever you have used for the back but you need to cut enough to go more than all the way around. Simply stitch these together end to end and then lie it out around your quilt to check its long enough. If not stitch on another strip or two. Then press open these seems and press your binding in half lengthways.

Now trim down any extra binding and backing that you have. Then line up the open side of the binding to the middle of one edge of your quilt, fold the very end of the binding over and start stitching with about a 1cm seam. You can pin it on if you like but you probably won't need to.  Sew all the way down the side until you are 1cm from the next edge:


Now you need to fold the binding out at right angles to the line you just stitched, away from the quilt like this:

Then fold it again back over so your fold line is along the edge you have just stitched along like this:

And you should have a little triangle like this:


Now you need to stitch along this new edge all the way to the next corner and then fold it in the same way. Go all the way around the quilt until you get back to where you started, overlap the beginning by a few centimetres and then cut off any excess. Then fold the binding over the edge of the quilt to the back and slip stitch it on. You can find instructions for slip stitching here. This is done by hand but it I always quite enjoy sitting down in front of the telly, quilt over my lap, stitching the binding on. My slip stitching is no where near as good as the tutorial above but I am quite pleased with it still, its a big improvement on my first few attempts.


Then you need to just trim off any threads that you have sticking out and you're done. Woohoo! I hope you have enjoyed making a quilt with me, If you have any questions please feel free to comment or if you have some photos why not instagram them and use the Tadpegs hashtag or @zoeblofeld.

We tried to take pictures of the finished quilt this weekend but it was a bit windy! I will try and get a better shot when the storm has ended. I'll show you the quilt on my bed very soon, we are decorating our room and I want to show you it all in one go. Zoe xx

If you want to make yourself a quilt you can find the other stages here:

Choosing Fabric
Fabric Cutting
Piecing
Assembling the Quilt Top
Making the Quilt Sandwich
Quilting
Related Posts Plugin for WordPress, Blogger...