Patchwork Cushion // Cut and Sew Your Fabric For the Checkerboard Cushion


So thanks for sticking with me through some sewing basics. Today its time to start a simple sew project. By now you should have what you need to make 2 cushions. We will start with the top for the checkerboard cushion. This tutorial will results in a classic patch used in many quilts, so you can easily use these instructions to make patches to sew together to make a larger project if you fancy it. Today we will just start with one.

Prepare Your Fabric
You should have 1m of lining fabric and then 2 fat quarters of fabric for the checkerboard. If you haven't already you will need to wash this fabric before you start cutting, once it's dry iron it ready. You need to cut your two fat quarters in half, one half will be used for this cushion and the other for the half square triangle cushion. You may have bought 1.25m of fabric to be both your lining and 1 colour for the checkerboard. If you did this then cut off the extra 25cm of fabric and cut this in half to give you two halves of fat quarters.

Make a Pattern
Once your fabric is ready you need to make your self a pattern, or a template for the shape and size of the pieces you need to cut out. On some normal paper (I use greaseproof paper from the kitchen because its bigger) draw a rectangle that measures 2 1/2" by 20". Cut it out.


Cut Your Pattern Pieces Out of the Fabric
Now draw around your rectangle pattern piece 4 times onto both of your half fat quarter pieces. Then using your fabric scissors cut these out:
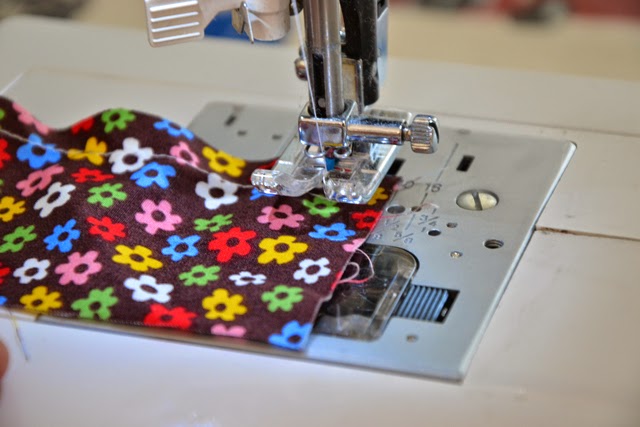
You should now have 8 strips of fabric, 4 from each colour.

Start Sewing
You can now start to sew these together. Start by putting one black piece right sides together with one white piece and pinning into place:

Then use a 1/4" seam allowance to sew along one of the long sides:

Now open out the two pieces. Take another white rectangle and line right side and a long edge up with the right side of the other long edge of the black piece, pin and sew using another 1/4 inch seam allowance. Keep on adding your rectangles, alternating colours, until you have something that looks like this:


Press your Seams
To get your cushion top looking sharp and neat you are going to need to press the seams. When quilting the general rules for pressing seams are to
1. Press towards the dark side and
2. Press in alternating directions.
It won't always be possible to do both of these so you have to work out which is more important. We press towards the dark side so that you can't see the darker fabric seam showing through on the front. We press in alternating directions so that when you come to sewing several seams together at a corner point they will lie nice and flat.

On this occasion we can do both. So at every seam, using your hot iron and ironing board, press the seam towards the dark side. Avoid using steam because it can distort the shape of the pattern pieces. When you are done you should have a patch that looks like this from the back:

And when you turn it over your patch will be lovely and flat and your seams beautifully crisp:


Turn Stripes into Check
Now I know so far that this doesn't look much like a checkerboard. Well quilters try to be very thrifty with their time by minimising the steps they need to do. To turn this into a checker board we need to get our pattern piece (the paper rectangle) and use it to cut strips of the same width (2 1/2") across:

Cut all the way along until you have 8 strips:

Now you can turn every other strip upside down:

And you can see how the checkerboard will start to form. Put every second strip right sides together with the strip before it and stitch along one long edge with you 1/6" seam allowance:

Open these out and each pair, with right sides together, with another pair:

Then open these out and sew these two together along one side with a 1/4" seam allowance:


Now you have sewn it all together you just need to give all your seams a final Press. This time you won't be able to follow both rules but you can press in alternating directions to give you this:

And give it a good press from the front side too to give you a lovely checkerboard patch:

Easy as that! Even mine hasn't matched up quite perfectly but you should definitely be on your way to making yourself a patchwork cushion. Yippee! On Tuesday I will go through how to make the half square triangle patches. Zoe xx

Patchwork Cushion // Cut and Sew Your Fabric For the Half Square Triangle Cushion

On Friday I went through the steps to make yourself a 'checkerboard' cushion top and today we will go through making a half square triangle cushion top. The cutting and sewing technique I am going to go through is one that is used very often in patch working and quilt making. Just as with the checkerboard, you sew some, then you cut some and then you sew some more to help make your work quicker and easier.

You should have a 'half fat quarter' left of both your fabrics from making your checkerboard top. You will need both of these for this part. Cut each of these 'half fat quarters' into 8 squares that measure 5" by 5". You can make yourself a paper template again if you like and draw around it onto the fabric, or you can just draw your line straight onto the fabric and then cut them out.

 When you have 8 squares of each colour draw a line down the diagonal centre of all the lighter coloured fabric squares on the 'wrong side'. Then put each of these right sides together with a square of the other colour. You might want to pin these in place but you can probably manage without on this occasion.


Then sew a line of straight stitching on either side of this drawn line. The sewn lines should be 1/4 inch away from row drawn line. You might want to draw these lines on first but you can also use the edge of your presser foot as a guide.

Do this with all 8 pairs of squares. Then cut along the drawn line:

When you then open these out you will get your half square triangles:


 You can then press the seam 'to the dark side'. Give them a good press on both sides to make the seam lie nice and flat. You can use these half square triangles in any way you like, try out different arrangements for them, until you are happy with the layout. (You could also make lot's more using this method to make yourself a union flag quilt if you are feeling brave.)

But when you are happy with your arrangement, sew one row at a time together, with right sides together. Then press all these seams. Try and alternate the seam pressing and if you can also press towards the dark side. Then sew all your rows together to make your finished cushion top.


And you have finished another cushion top! Woop! If you have any questions about the steps so far, then just leave a comment and I will try to get back to you. On Friday I will go through how to line these cushion tops so don't forget to come back for that, Zoe xx

Patchwork Cushion // What You'll Need


YEY!  We have finished an introduction to sewing in Sewing School! Now its time to start making something. Woohoo! I have given you a list of ideas to work on but this tutorial is going to be broken down into bite sized chunks so even the most apprehensive learner will be able to take it all in. Over the next few weeks I will be going through the steps to make these two patchwork cushions. Mine are very simple black and white but you can make them from any fabric you like.

The first cushion is the checker board cushion:

And I'll also be sharing instructions for making a 'half square triangle' cushion:

To make both cushions you will need:

1 Fat Quarter (quarter of a metre) of fabric 1
1 Fat Quarter of fabric 2
1 Metre of fabric to line and back the cushions
2 16 inch square cushion pads
Coordinating thread
Sewing Machine and other basic supplies

My fabric 1 is the black fabric, my fabric 2 is white and I also used white for the lining and backing. So altogether I had 1 fat quarter of black and 1.25m of white. When choosing your thread choose a colour that match the darker of your two fabrics, so I used black thread. When you get your fabric make sure you prewash them to prepare them for sewing.

This is how the steps will be broken down:
1. Cut and Sew your fabric for the checkerboard cushion
2. Cut and Sew your fabric for the half square triangle cushion
3. Sew the lining onto your cushion top
4. Sew Up a Cushion

Come back on Friday and we can start cutting your fabric.  Zoe x

A Few Small Updates


Have you noticed anything different? Well probably not but I just wanted to highlight a few new things around here. I've been wanting to update my 'category pages' for a while to have more relevant headings for what I actually write about. So you can have a look through the new pages, Sewing School, Sewing Projects, Photography, Crafts and Food and it should be easy to find what you are looking for. Sorry if you were browsing through yesterday evening, that was when I was updating it all and it probably looked a little strange.


I also wanted to simplify everything a little and just opt for plain Black and White. Hopefully this will mean when I make something colourful it won't clash horribly with the header! But I plan to still be using lots of colour in my fabric choices and other posts. Enjoy the new site and have a look around through the category pages and tell me what you think. There are a few small alterations to come but I just need to get a good profile picture first! See you next week for making a Patchwork Cushion or two. Zoe x

Sewing School // Ideas For Beginner Sewing Projects


If you have been following along with Sewing School you are probably desperate by now to actually make something. Finally here is a list of ideas of things that you could make with the skills you have learnt over the last few weeks. At the time of writing most of these projects I didn't have Sewing School in mind so there may be gaps in the explanation, if there is anything you don't understand then feel free to ask your questions in the comments section below and I'll get back to you. But all these projects are suitable for a learner sewer so just choose the one you'd like to make the most and start sewing!

I'll start with the smallest and simplest projects and work up to a few bigger more ambitious ones. Even the bigger ones though will be suitable for a beginner so feel free to jump in at the deep end.

My first suggestion is to make yourself a simple infinity scarf. This is made from only 1 metre of fabric so isn't too expensive, but also it is incredibly easy. As long as you can sew in a straight line, you can make one of these.

Next week I will be going through a set of step-by-step tutorials for making some patchwork cushions, if you can wait just 7 more days then this will be a very easy place to start too.

If you are mad into coffee and can only tolerate the proper stuff then maybe you could make yourself a bunch of coffee bags. 

If you feel up to sewing a curve then you could try making one of these peg bags. Again it's very simple and only uses a small amount of fabric. Plus there is plenty of summer left to use it when you hang out your washing.


Or you could try sewing a tote bag. Its a little more fiddly than a peg bag but gives you more practice on your machine. There are lots of straight lines and corners to sew but no curves.


If you'd like to make a quilt then this star pin wheel baby quilt is really easy for beginners plus it makes a really lovely gift to someone who is expecting (yours doesn't have to be pink or course!). This project is mostly straight lines, it's just a little bigger than the others so far so will take a bit longer for you to finish it.


Or you could go all out and make yourself a double quilt like this octagons quilt. My first project was a double quilt so I know it's possible even for a beginner.

I am also going to be making a simple circle skirt soon with step-by-step instructions, but I have no picture yet to show you (it is finished but not photographed). It will be easy enough for a beginner and you'll have something you can actually wear afterwards. (There won't be a zip or buttons so I am sure you can do it!)


If you can't wait for my circle skirt walk through then maybe you could make a picnic blanket skirt following Tilly and the Buttons instructions. You'll learn to gather fabric and sew on buttons and button holes so if you are hoping to keep learning then this is a great project.

I hope you have been learning lots so far. Don't forget to come back to learn to make patchwork cushions and then a circle skirt. Zoe xx

Sewing School // What is a Pattern?

Even if you are just learning to sew you have probably heard of the phrase 'sewing pattern.' Before I learnt to sew clothes I certainly had, but I was pretty nervous about buying a pattern because I didn't know what they would be like or even what a pattern was. Well today I am going to explain all so that you don't have to feel nervous too.

What is a Sewing Pattern?
 A Sewing Pattern, called a pattern for short, is simply the shapes that you will need to cut out of your fabric. Drawn on these shapes are some markings that will help match the right parts up together, cut out pieces out in the right place on your fabric and all the information you need to sew it up. Often with the pattern you will also get some instructions for what you need to do and in which order. Sometimes though, especially with older patterns, the pattern maker will assume that you know how to sew it together already.

Sometimes the pattern will be instructions for the shapes that you need to cut out, for example you might need a rectangle that is 5cm by 25cm. Other times you will actually have the shape that you need to cut drawn onto some paper. You can then cut out the paper shape and draw around it onto your fabric.


What Kind of Patterns are Available?
You will be able to find a sewing pattern for just about anything that can be sewn together. Modern dressmaking patterns, such as this pattern for the Elisalex dress from By Hand London, will have the pattern printed on a very large piece of thin paper. Each size will be drawn on with a different line:

You need to measure yourself to work out which line is the best one to fit you. You can then trace this shape off, and cut it out before marking it on your fabric. The patterns also have markings like the little bold squares, you match these up to the markings on another pattern piece to make sure you are sewing it in the right place. I will write a post another day about all the different kind of patterns markings, let's just stick to the basics for now.

Some older patterns will only include one size rather than a range of sizes. Be careful if you buy one of these to check the measurements for the size. If you fit a size 10 now, that probably wasn't the same as a size 10 from 20 years ago.

There are also many printable pdf patterns around now too. These are e-mailed to you for you to print at home and stick together before you cut out the right shape. These can be an excellent way to get your pattern straight away if you just can't wait any longer, but the sticking them together part can be quite time consuming so it isn't always better. Some great free patterns are available like this now too.

What Do I Need To Know Before I Start Cutting and Sewing?
If you have found a pattern you are interested in buying and sewing then there are a few things you should know before you start.

First of all sewing patterns usually include their seam allowance. They will state how wide the seam allowance should be, but the actual line you sew on won't be shown on the pattern. Therefore the line on the pattern is the line you need to cut along. You will need to sew the distance of the seam allowance away from this line for your pattern to fit together properly. Find out more about seam allowances here.

Secondly don't forget to have a look at the recommended fabrics for that pattern. Try to buy something as close as possible to the right weight of fabric or you'll find it doesn't turn out the way you would like.

Finally have a think about the things you know how to do before you buy a pattern. If you have seen a dress pattern that has a lapped zip, a rolled hem and is made from a very fine and lightweight fabric its probably not the best thing to try for your very first one. Wait a while and when you have sewn up a few other things then go back to that one later.

So this is a very brief introduction to what sewing patterns are. I will go into more detail about the different markings and instructions soon. On Tuesday next week I will be suggesting a few beginner sewing projects so don't forget to come back then. Zoe x

Sewing School // Hello Fabric

When it comes to choosing fabric for a sewing project the options are almost endless. This for me is the best part about being able to sew, I can choose exactly what I want my dress/quilt/'insert any other fabric made item here' to look like. I am not limited by what is currently available in my local shop or online. If I like a particular style that went out of fashion twenty years ago I can remake it today. But before you reach the stage of making anything you'd like from any fabric you can find you will need to know a little bit about what to look for.

What Kind of Fabric?
Most good patterns that you find will give you some suggestions of the type of fabric to buy. I would say, before you consider what print you'd like the fabric to be, you need to think about 3 main factors of your fabric.

1. How Thick Do I Need My Fabric To Be?
Fabric can vary from very thin (or lightweight) to very thick (or heavy). The lighter it is the more floaty your fabric will be. Aim to buy something as close as possible to the suggested fabrics on the list. For example, if you're hoping to make a summery vest top you'll probably need something quite lightweight, but you could probably get away with something a little thicker if you find something you love. But your top just won't look right if you try and make it form some upholstery cotton (which is very thick and heavy). In contrast if you want to re-upholster a chair then the lightweight organza you have fallen for probably isn't going to be hardwearing enough to cover your furniture.

2. What Is It Make From?
Most fabric you will find will probably be cotton based. Cotton is a good place to start when you are learning to sew, it's easy to work with, washes well and comes in every colour and pattern you can probably imagine. If you have a look in the labels in your clothes you will see some other options of what is available. When you get dressed over the next week or so check out each label and feel the fabric until you have an idea for what different fabrics feel like. I can't possibly list everything that is available here but your project pattern will probably have some suggestions and you can always ask in your local fabric shop, they'll be happy to explain it all to you.

3. Does is Stretch?
If your project says you need a stretch fabric then buying something that doesn't stretch simply won't work. Fabrics with no stretch (or at least very little) are much easier to sew with when you are just learning so look out for projects made from 'woven' fabrics. Woven simply means that the fabric won't be stretchy. When you have mastered this you can move on to the stretchy stuff. When it comes to stretchy there are two mains kinds. Firstly 'knit' fabrics which have non stretch cotton threads knitted together to give it some stretch. Or 'jersey' which are made from stretch threads.

Where Can I Buy Fabric?
When you first start out buying fabric it can be tough to find the right place that sells what you are looking for. Find out if you have any local shops that sell fabric. Some fabric shops may only sell a certain type of fabric though, for example we have a little shop near us that sells quilting fabrics and they're all quite traditional prints. I would come out an unhappy shopper if I went in there looking for something to sew up a party dress. But you might find something near you that sells exactly what you are looking for. Once you have looked locally have a browse online, there are now hundreds of places that you can order your fabric from and most are happy to send you a sample before you purchase a few metres. You can also have a look on eBay, you'll probably be surprised how many companies sell fabric via eBay. The fabric shown at the very top of this post is all vintage sheets collected from charity shops or car boot sales so don't rule these out as options for places to look.

How Much Should I Buy?
Fabric usually comes in 1 of two widths, either 45" or 60" across. Then you can buy whatever length you need of that width. Most patterns will tell you right at the start how much of each width you need. Sometimes a pattern will talk about Fat Quarters (or FQ's). To get a Fat Quarter the seller will cut 1 yard of their fabric, then cut in half and in half again. Thus they make 4 pieces, or 4 quarters of a metre; hence Fat 'Quarter'. Buying fabric by the fat quarter is really handy if you are making something that needs smaller pieces such as a quilt or a cushion cover. If you are making something larger like clothing and you don't have a particular project in mind yet then 2-2.5m of the fabric will be enough for most items of clothing. You can always buy it and look for what you want to make with it afterwards.

Finally, What Do I Do With It?
Having spent all that time and effort choosing the perfect fabric it can be quite nerve-wracking to cut into it. To help you out I will explain a few things about it.


1. The Selvedge Edge
All fabrics come with a selvedge edge. This is a couple of centimetres of the fabrics running all the way down the edge that is woven more tightly than the rest to stop the fabric from unravelling when it's on the roll. As above, on many fabrics the selvedge will be a different colour to the main fabric, it may have little colour dots (or rabbits heads apparently) that represent the different colours in the fabric. This can be handy if you are trying to find to fabrics that will coordinate. Its a good idea when cutting the pieces for your project to avoid the selvedge. You won't want this showing on your project. If you know they will only be in your seam allowance then you can include them but only do this if you are sure. On plain fabrics the selvedge will probably be the same colour as the main fabric, you will be able to find it though by feeling along the edges, the one that feels the thickest is your selvedge.


2. The Right and Wrong Side
Most Fabrics have a right and a wrong side. As you can see above the 'right side' has the vibrant colours on and the 'wrong side' will be paler. On plain fabrics you may not be able to see a difference between the sides. When you cut out pattern pieces from your fabric make sure you cut them all out from the same side or you may find they don't match up properly. Also remember that most of the time you need to sew the pieces with 'right sides together' so that the seam will be on the back.

3. The Grainline and the Bias
These two words are important when it comes to cutting up your fabric. They both refer to a direction along the fabric. The Grainline is the direction that is parallel to the selvedge. Many patterns will have markings on to show you which way the grain line should lie for each pattern piece. Try to put this line as close as possible to the grain line.

The Bias on the other hand runs diagonally across the fabric. If you cut your fabric on the bias it has more movement and becomes almost stretchy. It can be very important to cut your fabric on the bias. So when you start cutting it up pay close attention to which direction you need to cut.

So there you have it, this guide to fabric will set you off in the right direction as you learn to sew. I am adding an extra section in to 'Sewing School' before I give you some suggestions for beginner projects on understudying patterns. So come back on Friday to see this. Have fun. Zoe xx


Sewing School // Everything you ever need to know about seams


Now you know how to set up your machine and use it, it's time to start learning some of the basic sewing terms so you can begin to understand instruction in a sewing pattern. One of the most important term to learn is a 'seam'.

What is a Seam and Seam Allowance?
The seam is where two fabrics are sewn together along their edges. Most of the time when you sew, you are creating a seam. The seam allowance is the distance between the very edge of the fabric and the place where you need to sew. When you start a sewing project the seam allowance will be given to you, it may be different in different parts of the project but usually its the same all the way through. Conventionally in patchwork type project we use a seam allowance of 1/4 inch (6mm) while in dressmaking the usual seam allowance is 5/8 inch (18mm).

Sewing a Straight Seam
Most project include some straight seams, this is when the edge of your fabric pieces are straight with no corners or curves. To sew a Straight seam, first of all you need to put your two pieces of fabrics 'right sides together'. I will go into this in more detail when I talk about fabric on Tuesday but the side of your fabric you want showing on the outside of your project needs to be together:

Then you can pin your fabric piece together. Take your pins and push them through the fabric from the top to the bottom and then back up to the top again. The pointy end of the pin should be pointing into the fabric and away from your seam:

This makes it easier to take it out again before you sew that section. Put pins all the way along the edge you want to sew at regular intervals.

Once sewn you can open out the fabrics, the seam allowance and the stitching will all be hidden around the back. You'll notice though that this won't lie flat yet. You'll need to press the seam with your iron. Plug your iron in and turn it up to the highest heat that your fabric can take without changing shape. On the seam side, or the back, of you fabric you will need to iron along the seam. There are a couple of options:

Either press both edges over to the same side, called 'pressing the seams to one side'. Or press the fabric edges in opposite directions called 'pressing the seam open'. It depends on the project that you a are doing on which way you will need to press the seam. For quilts its usually over to open side and for clothes its often open but can vary from project to project. 

Finishing the Raw Edges
When we cut our fabric it can start to fray, especially if we use a lightweight fabric or when we wash it. To minimilise this we 'finish the raw edge'. There are many ways to do this so I will just go through two of the simplest ones for now.

The top example shows zigzag stitching along the raw edge. To do this simply select the zigzag stitch on your sewing machine and sew all the way along the seam. You can do this with both pieces together as I have when your seams are pressed to one side or you can zigzag stitch along each edge if you have pressed your seam open. 

The bottom example shows an edge finished with pinking sheers. These are very sharp scissors than cut a zigzag line. You would need to invest in some pinyin sheers to do this method but its much quicker than zigzag stitching all your seams so its worth thinking about if you want to get your project finished quickly.


Stitching Corners
Some seams may require you to stitch a corner. This is actually much easier to achieve than you may think. Simply sew along one edge, when you get to near the corner turn your wheel in the top right hand corner of your machine until the needle is down:


Then flick up your presser foot lever:


Then turn your project around so you can start sewing along the other edge:


And flick your presser foot down again to start sewing. See easy peasy.


Stitch Curved Seams
Some project will require a curved seam. Usually the two curves that you need to sew together will be the same length but different shapes.

When you pin these together you need to 'hill' of the curve to be on top and the 'valley' to be underneath but still with right sides together. This will make it much easier to sew together. Pin as you did with the straight edge, pins all the way along the edge at regular intervals with the point going in towards the fabric from the seam. You need to curve the 'valley' seam around as you go.

Now when you take the seam to the sewing machine ready to stitch it will curve upwards, this makes it much easier to feed it into the machine. You pins will still be in the right direction for you to easily pull them out as you sew. Other than the pinning part, sewing a curved is exactly the same, start and end with a few reverse stitches and keep the edge in line with the right part of your needle plate.

Now you know everything you need to know about seams (well almost). Come back on Tuesday to find out about fabric. Zoe

Find out more about Sewing School here.
Related Posts Plugin for WordPress, Blogger...