Showing posts with label Fabric. Show all posts

Sewing Plans and Stash Busting


Over the last few weeks I've been having a sort through all my fabric. I rediscovered quite a few pieces that I bought over the last couple of years but never got round to using. I also found several pieces of half used fabric which I intended to use up but never got round to. I decided that I should take a month making things out of these 'forgotten' fabrics before buying a whole load more that would just sit in the cupboard.

What follows are some of the projects I've started, some I am planning and others that I need some help deciding what to do. Fancy helping me out? Then lets go!


First of all I am re-making my stripy plantain tee, this one that then shrunk in the wash and became this one. Sadly I didn't have enough fabric left for a long sleeve one but was pleased to be able to cut out a short sleeve version. That should be ready soon because it's such a quick pattern to whip up.

I've also been chopping up some old clothes to turn into new ones. The above used to be a black 'body- con' dress which I never ever wear so I have chopped off the top and I'm going to turn it into a simple black skirt. I think it'll look good if a little shorter than I would usually choose.

I've also started a circle skirt made with the lighter denim I used for the sleeves and pockets of this dress. I always intended to make a skirt too so bought enough fabric especially. I love to try and make more than one thing from the same fabric because it saves money in the long run.


Now for a few things I am planning to make but haven't started yet. I made a little dress for my niece out of the above fabric and I have lots left. I am pretty sure I am going to make myself a top (or two) out of it even though it probably isn't my usually style. What do you think? Should I go for something a little more adventurous? I would really like to buy the nettie bodysuit pattern but am reluctant because you can only get a pdf version at the moment (and these drive me mad). This fabric is really stretchy though so I think it would be a good pattern to use.

I also have some black and some white jersey. I think the black would be better as a simple tee or vest but the white is also stretchy enough to make a bodysuit from. I definitely need to make some more basics still so I should really bump these two up the queue. Its more fun to sew with patterned fabric though right? Which brings me to this fabric:

I bought this spotty fabric nearly 2 years ago and still haven't decided what to do with it. When I ordered it I didn't read the description properly and thought it wasn't so sheer and when it arrived I was scared to use it. I think I am probably up to the challenge now though given how much practise I have had in those 24 months but I can't decide what to do with it! Part of me would like to make a really simple vest or tee, maybe a laurel? The other part of me thinks it would make a gorgeous mimi blouse, maybe with a peter pan collar though, but I am not sure! What do you think?

And last to decide upon is this beauty. I bought it on a whim after seeing this playsuit. I love it, I just don't know what to do with it. My options are some narrow leg trousers, a laurel dress, a playsuit, an Anna dress, some kind of top or basically anything else you can think of! Since I love it I really want to make something that I will actually wear out of it but also I want to be able to make all of the above because I like the idea of lots of options. So what do you think about this one? I am open to other ideas here so let me know.

As you can see I have lots I can do without really spending any money so I will probably be busy at least until the end of April and if not through May as well. I am in the process of taking photos of each handmade item currently in my wardrobe so I can see what outfit options I have and make some sense of my growing capsule wardrobe. I'll show you when I am done. See you soon. Zoe x

Sewing School // Hello Fabric

When it comes to choosing fabric for a sewing project the options are almost endless. This for me is the best part about being able to sew, I can choose exactly what I want my dress/quilt/'insert any other fabric made item here' to look like. I am not limited by what is currently available in my local shop or online. If I like a particular style that went out of fashion twenty years ago I can remake it today. But before you reach the stage of making anything you'd like from any fabric you can find you will need to know a little bit about what to look for.

What Kind of Fabric?
Most good patterns that you find will give you some suggestions of the type of fabric to buy. I would say, before you consider what print you'd like the fabric to be, you need to think about 3 main factors of your fabric.

1. How Thick Do I Need My Fabric To Be?
Fabric can vary from very thin (or lightweight) to very thick (or heavy). The lighter it is the more floaty your fabric will be. Aim to buy something as close as possible to the suggested fabrics on the list. For example, if you're hoping to make a summery vest top you'll probably need something quite lightweight, but you could probably get away with something a little thicker if you find something you love. But your top just won't look right if you try and make it form some upholstery cotton (which is very thick and heavy). In contrast if you want to re-upholster a chair then the lightweight organza you have fallen for probably isn't going to be hardwearing enough to cover your furniture.

2. What Is It Make From?
Most fabric you will find will probably be cotton based. Cotton is a good place to start when you are learning to sew, it's easy to work with, washes well and comes in every colour and pattern you can probably imagine. If you have a look in the labels in your clothes you will see some other options of what is available. When you get dressed over the next week or so check out each label and feel the fabric until you have an idea for what different fabrics feel like. I can't possibly list everything that is available here but your project pattern will probably have some suggestions and you can always ask in your local fabric shop, they'll be happy to explain it all to you.

3. Does is Stretch?
If your project says you need a stretch fabric then buying something that doesn't stretch simply won't work. Fabrics with no stretch (or at least very little) are much easier to sew with when you are just learning so look out for projects made from 'woven' fabrics. Woven simply means that the fabric won't be stretchy. When you have mastered this you can move on to the stretchy stuff. When it comes to stretchy there are two mains kinds. Firstly 'knit' fabrics which have non stretch cotton threads knitted together to give it some stretch. Or 'jersey' which are made from stretch threads.

Where Can I Buy Fabric?
When you first start out buying fabric it can be tough to find the right place that sells what you are looking for. Find out if you have any local shops that sell fabric. Some fabric shops may only sell a certain type of fabric though, for example we have a little shop near us that sells quilting fabrics and they're all quite traditional prints. I would come out an unhappy shopper if I went in there looking for something to sew up a party dress. But you might find something near you that sells exactly what you are looking for. Once you have looked locally have a browse online, there are now hundreds of places that you can order your fabric from and most are happy to send you a sample before you purchase a few metres. You can also have a look on eBay, you'll probably be surprised how many companies sell fabric via eBay. The fabric shown at the very top of this post is all vintage sheets collected from charity shops or car boot sales so don't rule these out as options for places to look.

How Much Should I Buy?
Fabric usually comes in 1 of two widths, either 45" or 60" across. Then you can buy whatever length you need of that width. Most patterns will tell you right at the start how much of each width you need. Sometimes a pattern will talk about Fat Quarters (or FQ's). To get a Fat Quarter the seller will cut 1 yard of their fabric, then cut in half and in half again. Thus they make 4 pieces, or 4 quarters of a metre; hence Fat 'Quarter'. Buying fabric by the fat quarter is really handy if you are making something that needs smaller pieces such as a quilt or a cushion cover. If you are making something larger like clothing and you don't have a particular project in mind yet then 2-2.5m of the fabric will be enough for most items of clothing. You can always buy it and look for what you want to make with it afterwards.

Finally, What Do I Do With It?
Having spent all that time and effort choosing the perfect fabric it can be quite nerve-wracking to cut into it. To help you out I will explain a few things about it.


1. The Selvedge Edge
All fabrics come with a selvedge edge. This is a couple of centimetres of the fabrics running all the way down the edge that is woven more tightly than the rest to stop the fabric from unravelling when it's on the roll. As above, on many fabrics the selvedge will be a different colour to the main fabric, it may have little colour dots (or rabbits heads apparently) that represent the different colours in the fabric. This can be handy if you are trying to find to fabrics that will coordinate. Its a good idea when cutting the pieces for your project to avoid the selvedge. You won't want this showing on your project. If you know they will only be in your seam allowance then you can include them but only do this if you are sure. On plain fabrics the selvedge will probably be the same colour as the main fabric, you will be able to find it though by feeling along the edges, the one that feels the thickest is your selvedge.


2. The Right and Wrong Side
Most Fabrics have a right and a wrong side. As you can see above the 'right side' has the vibrant colours on and the 'wrong side' will be paler. On plain fabrics you may not be able to see a difference between the sides. When you cut out pattern pieces from your fabric make sure you cut them all out from the same side or you may find they don't match up properly. Also remember that most of the time you need to sew the pieces with 'right sides together' so that the seam will be on the back.

3. The Grainline and the Bias
These two words are important when it comes to cutting up your fabric. They both refer to a direction along the fabric. The Grainline is the direction that is parallel to the selvedge. Many patterns will have markings on to show you which way the grain line should lie for each pattern piece. Try to put this line as close as possible to the grain line.

The Bias on the other hand runs diagonally across the fabric. If you cut your fabric on the bias it has more movement and becomes almost stretchy. It can be very important to cut your fabric on the bias. So when you start cutting it up pay close attention to which direction you need to cut.

So there you have it, this guide to fabric will set you off in the right direction as you learn to sew. I am adding an extra section in to 'Sewing School' before I give you some suggestions for beginner projects on understudying patterns. So come back on Friday to see this. Have fun. Zoe xx


DIY Scrap Fabric Tape

Sometimes I just can't bare to throw away my fabric scraps, even those tiny ones that would be far too small to actually sew with. This little project is an easy way to use up all those teeny little bits and make something useful with those too. Plus it's dead easy.


What you need:
Fabric scraps of any size
Scissors (can be normal paper scissors)
Double sided tape

What you do:
Simple cut some strips of double sided tape slightly shorter than your fabric scrap. Then stick them down next to each other onto the fabric.

Then use your scissors to cut them up into strips. You can use them straight away by peeling off the paper back or you can store them away for another day if you aren't ready to start wrapping.


These are pretty sticky so can hold the paper around a present but they don't last as well as washi-tape so sadly you can't use them to decorate with. They're good fun though and make your presents look pretty. Have fun, Zoe xx

Indian Stars Quilt

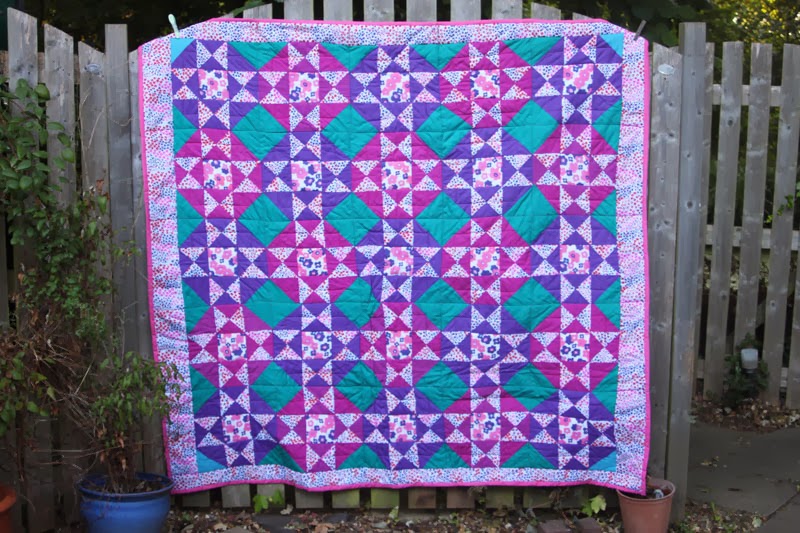
This is the third quilt I ever made, I thought I would share it with you. You can see the first here and some day I will show you the second. I made this one for my mum. She went on a trip to india a few years ago and bought the bright coloured fabric for me to sew up into a quilt. I bought the floral fabrics to help break up the colour a little and to make it large enough for a double quilt.

Each block is a star block, like the large star on the star pinwheel baby quilt I showed you recently. The corners of every block are green so when you put them together it looks like there are green squares in between each star.

For the back I used more floral fabric and plain pink for the binding. I won't be sharing full instructions for this one but if you are thinking of making a quilt and don't know where to start the octagons quilts is a good place to look. Zoe x

Star Pinwheel Baby Quilt Part 2: Quilt Back


Yesterday I started sharing instructions to make a star pinwheel baby quilt and we made the star quilt top. Now to make a pinwheel for the back of the quilt. You may remember we cut out fat quarters into triangles like this:

We used the smaller triangles on the quilt top, for the back we need the larger triangles. Lay these out to form a pinwheel:
As you can see in the above picture a pin wheel is a square made up of triangles where the dark and light colours alternate to form a 'pinwheel' pattern. In a traditional quilt a pinwheel block is made up of only two fabrics but we are just making one giant one for the back of this quilt so its a little different. Tou need to take the darker triangles and lie them on top of the light triangle that they are next to with right sides together:

You can now take each pair of triangles over to your machine and stitch along the longest side, just as we did for the quilt top with a 6mm (1/4") seam allowance. Then you can press the seem to the dark side and this gives you four squares:

Be careful in all these steps to make sure you are stitching along the correct edge, you can mark it with a pin if you're unsure. Next you stitch the top two squares together to make a row and the bottom two squares together to make a second row using a 6mm (1/4") seam allowance and press the seams again to the dark side.

Then finally you take the top row, lie it on top of the bottom row with right sides together and stitch these two rows together keeping that 6mm (1/4") seam allowance. Press this final seam to one side, it doesn't matter too much which way.


Now you have made your quilt back you can start on your quilt sandwich. You can find instructions on how to do this here from my vintage sheets octagons quilt here. You will need your quilt top star, the quilt back pinwheel and 1m square of wadding. If you have any questions leave a comment and I will try and answer. Come back tomorrow for the quilting stage. Zoe x

Star Pinwheel Baby Quilt Part 1: Quilt Top


I've been waiting for ages to show you this quilt. I made it for my sister-in-laws baby but it was two weeks late so I have had to keep it quiet for much longer than I thought. I wanted to make a quilt for her baby and I came up with this idea when trying to devise a quilt that would be really easy for any one hoping to learn to sew.

This quilt is so simple to make, if you have ever considered making one try this because it's a great beginners quilt. You don't even need to buy a cutting mat and rotary cutter which are normally pretty essential for speedy quilt making. So if you know some one who is having a baby soon, or maybe your are? Or maybe you just want something to pop over your knee on a chilly evening, you should make one of these quilts. It's super easy and also inexpensive as far as quilts go.  Just follow along this week and you will have a quilt. Sorted.


You Will Need:
8 Fat Quarters, 4 dark and 4 light (any colour will do, or you could have 2 contrasting colours instead of dark and light)
Fabric Scissors (You can use a rotary cutter if you have one of course)
Sewing Machine
Thread
Wadding (Batting)
You might need extra fabric for binding depending on the size of your fat quarters

Make the Quilt Top
The quilt top, or the star, is the first thing you will need to make. Take a fat quarter and fold the corner up so that the side lines up with the top as shown (1). Then you need to cut off any excess again as shown (2). This leaves you with an exact square. Some fat quarters are cut as squares but normally they are cut from a metre of fabric (sometimes a yard) from the roll and then this metre is cut into quarters to make the 'fat quarters'. So unless the fabric was originally 1 metre across then you will have some extra. Save this extra piece for your binding (part 4).


Now that you have a square shape you need to carefully cut it into these 5 triangles:


To do this simply cut the square in half along the diagonal, then cut one of these triangles in half again, and finally cut these two smaller triangles in half again. Repeat with all your fat quarters until you have 8 large triangles and 32 small triangles.


Now you need to take your 32 small triangles and pair them up. Make 8 pairs with one dark and one light triangle,  4 pairs with both triangles from your darker coloured fabrics and 4 pairs with both triangles the lighter coloured fabrics. Then put each pair with 'right sides together' and with the long side of the triangles lined up.


Now you need to stitch together each pair of triangles along this longer edge leaving a 6mm (1/4") seam allowance. Then open out the triangles and you will see you have made them into squares, press the seams to one side, if you can press towards to dark side.


Next you can lay your squares out on the floor and arrange them into the star shape. You can move them around until you are satisfied with how they look. Then collect together each row of squares from left to right into a pile. With your sewing machine stitch squares together to make rows, make sure you have each square up the right way so that you keep your star shape. Sew with the squares right sides together and with a 6mm (1/4") seam allowance. Then press your seems to one side, again if possible towards the dark side.


Finally stitch the rows together, again with right sides together and a 6mm seam allowance. You may need to lay your rows out on the floor again to make sure you are going to stitch them in the right order.


And that's it! You have made a quilt top and it wasn't so hard was it? Well if you struggled with anything then let me know in the comments and I will see if I can help. I'll share with you the next stage next Tomorrow. Zoe x

Find the other 3 parts here:
Quilt Back
Quilting
Binding and Finishing

Ditsy Floral Polly Top From By Hand London


So my new years goal for making a new item of clothing per month has started with a bang, this Polly top which is a free pattern downloaded from By Hand London is the second thing I have made already! I am one month ahead! This was also the first 'real' pattern I have tried, by which I mean one that I haven't drafted myself. To be totally honest I think I made the wrong size, its a little bigger than I would like and thats after taking it in a little, but nonetheless I am pleased with the results.


I am very conscious that if I start making my own clothes its very easy to make lots of dresses and a few skirts and then end up with only half a wardrobe. So I really wanted to start with a few tops and make practical items. This one will be great when the weather warms up and a get a bit less pasty pale but I can easily wear it under a chunky knit for now.


One thing that I had to consider when cutting out my pattern pieces was how I could fit them all on to my fabric. The pattern suggests using 1.8m plus extra to make the bias binding. I only had 1.5m and couldn't easily get any more. To fit them all on to my fabric I did this:


I moved the fold of the fabric from the centre over to the left. This way I had enough space to place all my pieces on the fold and had lots left over to cut the bias binding from. The binding for the sleeves easily fit onto the space available. The binding for the neckline was cut out of two thin rectangles and stitched together to make one long piece.


I really enjoyed using a 'real' pattern, next time I will just have to get someone to measure me more carefully. The instructions with the pattern were very helpful and simple enough for a beginner. I definitely think I will invest in some other patterns in future, I am considering another pattern from By Hand London that I could make a summer dress from and then a winter dress from later on in the year. Do you think it's worth it? Do you have a particular pattern maker you prefer? I would like to have a good look around and investigate all the different ones.

The other thing I made was a top from jersey (stretch) cotton and I am pretty disappointed with it. This was in part because the fabric I bought was very thin and therefore tricky to work with but also because its not very flattering on me. Would you like to see it any way? Let me know. Zoe x

Make a Dress Up Dolly: The Clothes


On Monday I shared with you the tutorial for making a dress up dolly so next we need to make her (or him) some clothes. You can make up your own clothing shapes if you like but I have kept mine fairly simple. I have however made each dolly their very own 'super-suit' with their initial on the front, hehe!

What you need:
1 dress up dolly (see tutorial)
1 template from your dolly you have already made
fabric scraps
sewing machine
white thread
fusible bondaweb
Felt ( I used one colour for each dolly that I made so they didn't mix up their clothes).


Method:
Start out by ironing some bondaweb onto several bits of fabric, I used bits and pieces that were left over from quilting mainly but I would suggest having some denim and some white. For your other fabrics try and use fabrics with small patterns or that are plain because the pieces you will cut out will be very small.


Now to make your clothes templates use your dolly template as a guide and draw clothes shapes to fit her. You can be as imaginative as you like, if you want to make a super suit for yours then just cut off the head and hand from your template when you're done and use then. Then draw around these onto the paper side of the bondaweb. This is pretty fun because you can design an entire wardrobe out of your fabric scraps. If you are making a super suit for your dolly make sure you cut out the main suit form one colour and the boots, pants and initial from a second colour.

Then you need to cut out your clothes shapes from your fabric, take off the paper backing and lay them onto your felt so that none of them over lap. Leave off your boots, pants and initial of that super suit because you need to bond these to your suit NOT to the felt. (If you want to make a mask for your dolly to coordinate with your suit you will need to glue this to some prickly velcro.) Take a tea towel and iron the clothes onto the felt until they have bonded.

Next you can place the boots, pants and initial onto the super suit and iron these on (don't forget your tea towel!) You can also iron on any other details you like, for example a collar in a contrasting colour, a pocket on a dress or a pretty hem maybe.


Once these are all ironed to the felt you can use your sewing machine and stitch extra details onto the clothes like hems, pockets or embroidered details using some more fancy stitches.


This looks very messy because of all the loose thread but when you cut out these pieces, which is the next thing to do, they almost all get trimmed as you cut any way.


And there you have it, a lovely dress up dolly and her entire wardrobe. And now you know how you can add to her wardrobe any time you like. I hope you're little one enjoys it too. Zoe xx

You can find this and other tutorials over at Stitch By Stitch.

Homemade Wall Hangings Part II

This is the second idea for homemade wall hangings, you can see the photo hanging in part 1. For this second one we are going to make some art. You might remember me suggesting you save all your scraps from your quilt, even some of the quite tiny ones that were clearly too small to sew into anything and this is why. I was planning to make some 'art' out of them. Even if you haven't made a quilt or you have but haven't saved scraps you could easily make one of these out of some patterned paper, other fabric scraps cut into any shape you like.

I simply bought some blank canvases and got out my fabric scraps. I had a little play around with a few different layouts.

When I was happy with my layout I mixed up some PVA glue and some water to make a gloopy glue mixture (Mr Makers technical name for it). I then painted the canvas with the glue mixture. I dipped the fabric pieces in the mixture and then pressed them onto the canvass where I wanted them to go. It got quite messy so in hindsight I should have put some newspaper down underneath.

Then I made two more and left them out to dry. They're now up in our newly decorated bedroom. 

I find it hard to chuck away good bits of fabric, even these tiny ones so I am really pleased I thought up this project, plus it's much quicker and easier to use them this way than to try and fit them into a scrappy quilt. I have another idea for using some scraps that I will show you soon too, not for making art with this time... Zoe xx

Related Posts Plugin for WordPress, Blogger...