A Fun Dress For a Fun Girl

Just a quick one today to show you this cute dress I made for my niece. The present we gave her for Christmas was something she already owned, bummer, so I offered to make a some clothes instead and she was thrilled by this idea. She saw this fabric and was desperate for it to be a dress so here it is.

Its a stretchy cotton/lycra fabric that I bought on eBay, I have quite a bit of it so I'll be making my daughter a dress too and maybe myself something for the summer. I think it is perfect for a little girl though because it is so bright and fun. I drafted the pattern myself form a t-shirt of hers and just added a gathered skirt:

I topstitched the hems with pink thread because that is her favourite colour (no surprises there) and she has worn it a few times already. Don't worry she had thick coloured tights and a big knit jumper too so she was nice and warm. I think she'll get lots of wear out of it in the summer too when she can wear it just with flip-flops and sunnies. I'm looking forward to it already! See you soon, Zoe x

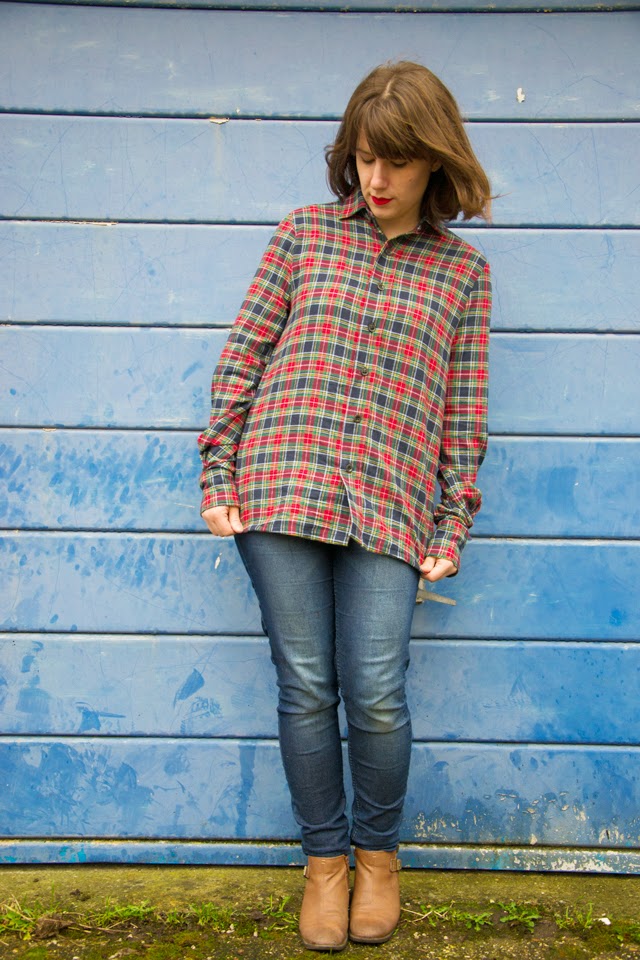
A Flannel Caroline Shirt (from a FREE pattern)


Have you seen this FREE pattern yet? The ladies over at Spit Up and Stilettos decided to make all their ladies patterns free for download and now sell children patterns. This pattern for the caroline shirt is one such item.

I have never made a proper shirt before so I am dead chuffed with this one. I found the instructions pretty easy to follow and there were lots of pictures to guide me through.

Before I tell you my mistakes I wanted to say this, Lauren from Spit up and Stilettos was SO helpful. When I was constructing the sleeves I couldn't find the cuff opening marked on the pattern so I cut it where the pleat was marked, this was the wrong place clearly so my cuffs open the wrong way around. I e-mailed Lauren to let her know it wasn't marked and she updated the pdf document straight away and apologised for the error. I was very impressed. I'll be shopping from them for some kids patterns at some point soon.

The only change I made to the pattern was to not sew all the way down the back pleat, I preferred it to be extra baggy to be extra comfy and casual. I think this shirt would be great in chambray too, you know I love me a chambray shirt!


This shirt definitely ticks the 'casual tops' box that I'm trying to fill. It is probably one of the last few Autumn/Winter makes I'll be making for this season though. Possibly one more dress to come. I know it is still cold outside but I want to get started with some spring sewing so I have some clothes ready in time!

I'll be chatting about spring sewing plans soon. See you then. Zoe x

Capsule Wardrobe // Let's Get Serious and Have a Clear Out


If you're serious about creating a capsule wardrobe there is one vital step that will get you started. The wardrobe clear out. ARGHHHH the thought of it fills me with dread. I really don't enjoy this process but I know it is necessary if I want to have a more simple approach to clothes (and to keep sewing new ones). I must make space for them somehow. So once you have thought about your capsule wardrobe style guidelines then a clear out is what you need. This week I actually went for it and ruthlessly cleared out my wardrobe. If you're about to take this dreaded step then here are my tips to get you started.

1. Take everything out
I know that this can make a huge amount of mess but I have recently realised this is the best way to start. I used to go through each item making a choice one by one. This meant that by the time I had got rid of about 5 items I wasn't so ruthless any more and found excuses to keep things (yes I know - I sound like a hoarder). By taking out everything and only putting back what you want to keep you are much more likely to have a proper purge.

2. Put back in the items you LOVE
Ignore your capsule wardrobe guidelines for a moment and put back the items you love. Hopefully these will be similar to the rules you came up with any way, if not then you might want to rethink some of your guidelines. Once your 'love' items are back in decide if your guidelines are right or if they need tweaking a little.

3. Put back any 'go with anything' items
You know the kind. The white t-shirts, the jeans, that skirt that you wear all through the summer because it is just so versatile. These items are your basics and you probably have worn them all lots in the last year. If you have loads of these then you might want to narrow it down a little. Keep the ones that are in good condition, those that still fit you and try to keep a mix of tops, bottoms and dresses - no big deal if you can't though, it'll help you decide what to sew next.

4. Decide on some things you definitely DON'T want to keep
By this point some things left in your pile to sort will cry out to be thrown away (well given to a charity shop any way). This part is simple, get a big back and put them it it ready to take the next chance you get.

5. Make a plan for all the 'maybes'
There will be a few things left that you can't decide what to do with. Hopefully if you have a bit of sewing practise under your belt you will see potential for what you could make with some of them but be realistic about what you will actually do. Keep these items near your sewing machine ready for next time you can't decide what to work on. For the rest pop them in a box up the loft, if you really miss something then you can get it out. Whatever is left in the box after a year can be taken down to the charity shop too.

So are you going to do it? It is a great way to start the new year and has made me feel like I have more things to wear because I can see it all properly when I open the wardrobe doors. Do you have any other tips you'd add? It's always good to know how other people do it. Let me know. Zoe x


The Christmas Bow Ties

When I made the two sparkly dresses I mentioned that I might make some bow ties to match for my sons. Well I only managed to do this on December 23rd so this is the first chance I have had to blog them. They looked really cute on both my boys but the younger son, age 2, took it off after about 30 seconds because it was itching his chin, I can't blame him but it means there is no photo of him actually wearing it. You'll have to accept a photo of my rather dashing older son:

Well I am a little biased but I thought he looked fabulous. I improvised how to make these but it was very similar to the method used for these cat bow ties if you fancy making some yourself. I think I may just make some for our cat next too (or is that a little too far?).

Any way I hope you had a really lovely Christmas and NYE. I'll be back on friday to continue the capsule wardrobe series. See ya later, Zoe x
Related Posts Plugin for WordPress, Blogger...