Sewing School // Hello Sewing Machine

Now that you have everything you need to learn to sew it is time to start using it. First of all you need to set up your sewing machine. If you have borrowed one from someone they might have given you a whistle stop tour which will be helpful but I will break it down for you today so you can begin to understand what they were on about. If you have your own sewing machine and your manual to hand, thats good because every sewing machine make is slightly different so you may need to look some things up.

My sewing machine is a Singer Confidence which was a birthday present for my 21st. Whatever brand you have the basics are the same. Before you can start sewing you need to set your machine up. The very first step is 'winding the bobbin'. So plug your sewing machine in and turn it on. You will also need to connect up the foot peddle. Once you are all plugged in, make sure you can sit on a chair with your sewing machine in front of you an can comfortably reach the peddle with you foot. Don't press on the peddle yet though!


Wind the Bobbin
To wind up the bobbin you need to put some thread on your machine. You may have one or two places to put your thread on. My machine (as indicated by the arrows) has two. The larger arrow points to a horizontal post, if you have one of these it is a better option for where to put your thread reel, just slide your thread reel on an then put on a little stopper to prevent the reel from coming off. The smaller arrow points to a little hole where a similar post can go but is vertical. You may only have this vertical post on your machine but pop your thread reel on in the same way. I am using my vertical thread post this time because my reel is too large for the horizontal one.

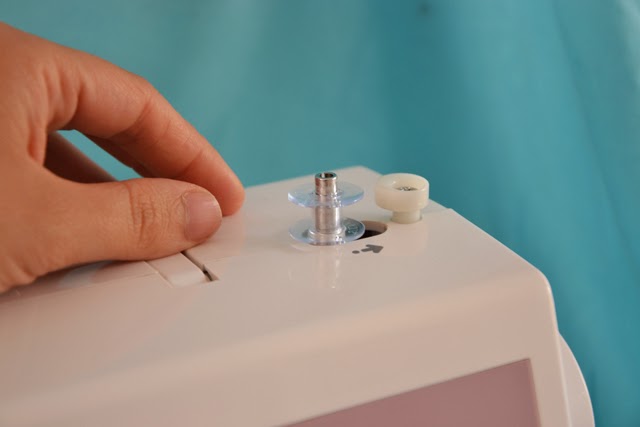
Then you need to pop a bobbin on to your bobbin winder as above.

Take the end of your thread from the reel and pull it under the guides. First under the metal guide at the back and then around the round winder guide as shown.

Finally there is a little hole in your bobbin which your thread needs to go through from the inside to the out. You may find it easier to take the bobbin off to do this but I prefer to do it while it is on. Then push your bobbin over to the right until it is up close the the bobbin stopper.

Now hold onto the end of the thread and press down on your foot peddle. This will start the winder turning around and will wind up thread onto your bobbin. Once the bobbin has enough thread on it should stop winding up, thanks to the winder stopper. It should look like this:

Now snip your thread and you can take the bobbin off the machine.


Attach the presser foot
If you haven't already got a 'foot' on your sewing machine this will be the next thing you need to do. Choose the foot that looks like the one above and rest it under the place where your needle is. The pull down the 'presser foot lever'. The foot should snap onto the foot holder but if it doesn't work first time wiggle it around and try again. The next thing to do is to thread the reel.


Thread the Reel
Your thread reel should still be on the top of your machine in the right place. Take your newly cut end (after winding the bobbin) and pull it behind the thread guide as you did when winding the bobbin. This time instead of taking it to the right and into the bobbin you need to pull it down the right hand slot in the front of the machine (as above).


When you reach the bottom of the slot, pull it back up the left hand slot and around the metal lever, then back down the same slot. When you reach the bottom of this slot, take the thread behind the thin metal hooks that are at the top of the needle and finally push the end of the thread through the sewing machine needle from front to back.You may find you need to snip the end of the thread to get rid of any frayed ends to make it easier to pass it though the needle.

Next up you need to put the bobbin under the needle plate ready for sewing, we call this threading the bobbin.


Thread the Bobbin
Again this varies from machine to machine but I will go through how to load your bobbin on a top loading machine. There will be a little plastic cover just underneath where the needle is, you will need to take this off. Then pop your bobbin inside the little round space, making sure the thread end is coming off in an anti-clockwise direction. My machine has a handy little diagram to show you how, but don't worry if yours doesn't, you'll get used to doing this quickly enough.  Pull the end of your thread out and underneath a little metal groove near the front of the bobbin.

Finally you need to bring the thread from the bobbin up so you can start sewing. The end of your thread from the bobbin needs to be up near the needle plate. Using your left hand hold on to the end of the thread from the reel, then with your right hand turn the hand wheel, on the top right of your machine, around. Turn it until the needle has gone down and up again and it will pick up the thread.  Then use some small scissors to scoop the thread out of your machine. Now pop your plastic cover back on.

And thats it, you have set up your machine ready to have a go a sewing. Come back on Tuesday to learn how to do so. Zoe xx

For more about Sewing School have a look here.


Sewing School // What You Need To Learn To Sew (no matter how small your budget)

Welcome to part one of Sewing School! (Find out more here) Before you learn to sew there are a few things you will need. There are probably a few people out there who are worried about learning to sew because they think they can't afford it. Well here is my list of things you need, suitable for almost any budget.

The Absolute Essentials (and how much to spend)
This part of my 'what you need list' is a list of things to have access to for a good starter kit for sewing. You can do some sewing with only half the list but most projects, and what I will cover in sewing school, will need all these things. But don't worry yet, its not going to break the bank.

1. Some Fabric To Sew: Fabric can get kind of expensive, and you may have your eye on something already but don't go forking out a fortune just yet. If you are just learning its a good idea to save the fancy and expensive fabric until another day. A good fabric to start on would be a non-stretchy cotton. Something like an old pillow case or sheet. You probably have one of these lurking at the back of a cupboard somewhere, if not an old top or skirt will do. Or if you really can't find any of these pop down to a charity shop and buy something there for a few pounds. To start with we are just going to be learning to use the machine so it really doesn't matter what it looks like. Cost: Free! (or a very small amount)

2. Something To Sew With, i.e a sewing machine: Arghhh, this is the part you're worried about, buying a sewing machine. Well fear not my friend, while I would recommend you get yourself a sewing machine if you are serious about learning to sew you can almost guarantee that you have a friend/relative/neighbour who has a sewing machine in their cupboard that isn't being used. Chances are they wouldn't mind lending it to you either. The best part about this, you can ask them how to use it when you pick it up so you don't even have to bother reading the sewing machine manual. Winner. If you start to enjoy sewing you can ask for a machine for your Birthday or Christmas or start saving, they really aren't too expensive. Cost: Free!


3. Something to Cut Your Fabric with: Fabric needs an extra sharp blade to cut through it. In the above photo you can see a few different options available to you. From the left we have dressmaking scissors, these are brilliant for cutting your fabric into the right shape and size pieces that you would need for most sewing projects. The pink pair are called embroidery scissors. They are good for snipping end of threads or cutting into seams (more on this during sewing school) but its virtually impossible to cut out a neat shape with them so you would still need some dressmaking scissors. The third pair along, the smaller black pair, is another kind of fabric scissors. They are cheaper and smaller than dressmaking scissors so can be good for small projects and if you are sewing on the go but aren't as easy to use. The last thing, the yellow one, is called a rotary cutter. If you are thinking of learning to quilt more than make clothes then investing in a rotary cutter will make your life much easier. They can be used in dressmaking too but can be a little more tricky than the scissors for cutting out the curved edges. The cost varies depending on which kind you buy but you could buy any one of these for less than £10. Cost £10


3. Some Thread: When you get serious about sewing you will probably want to buy yourself some thread to match each fabric that you buy. For now, while you just practice on your machine, you can use anything. The kind person that leant you the sewing machine might even let you use whats already on the machine, but if not head down to a local haberdashery and buy some. If you buy some white or black chances are you will use it up eventually. Before you pay just check with the shop assistant that the one you have chosen is compatible with sewing machines, some aren't and they end up getting all tangled up. Been there, done that. Cost: £1-2. (or less)

5. Hand Sewing Needles: While most projects do use a sewing machine, they quite often involve some hand sewing to finish them off. While you are in your haberdashery buying thread, buy yourself some needles too. Even if you aren't interested in sewing after trying it out you will probably need these one day to fix a hole, sew a hem or attach a name label to your kids PE kit. Cost: £1-2

6. Seam Ripper: Trust me you need one of these. Its the red thing with a see though lid in the photo above. This handy little divice with help you undo any mistakes you make. I still use mine lot's and I used it most when I was a beginner. Plus this is handy even if all you ever do is learn to hem your trousers. Cost: £3-4

7. Pins: The Last of your essentials that you need to buy are pins. Technically you could use masking tape instead of pins to hold two pieces of fabric together (or a pattern to your fabric) but pins will come in handy in other ways too as you learn to sew more and more. I have shown safety pins in the photo which can be useful but what is more useful are straight pins which are also called dressmaking pins. They are much quicker to use so when you are using your sewing machine you can quickly slip them out before the sewing machine needle hits them. Cost: £1-2

Other thing you will need but probably already have:
Pencil
Large paper or baking parchment
Paper scissors
Iron and an Ironing board
Ruler (the longer the better)
Tape measure (the long flexible kind, not the tool box kind)

Or buy a travel sewing kit and get a few of the listed items above at once.
A travel sewing kit won't have everything you need but it may cover several of the things mentioned above and therefore save you even more money by buying it all together. My sewing tin (shown in the photo) contains thread, needles, seam ripper, embroidery scissors, a thimble, buttons, pins, needle threader and a measuring tape! Check the contents before you buy one as they aren't always the same, but you could be saving yourself a few pennies and buying a nice tin or box to keep it in. Cost £5-10 (could be more if you get a really fancy one)

These few items are enough to help you learn to use a sewing machine and get to grips with the basics. I think the totally cost could be as little as £10 if you get a good travel sewing kit and invest in some dressmaking scissors. Each time you start a new project there will probably be a list of things you need for that particular project but the things in this list will be used almost every time you sew. In the next session I'll go through setting up your sewing machine with you before we can get started with sewing. See you soon, Zoe xx

Sewing School // What to Expect


So as promised next week is the start of sewing school. I wanted to give you a little introduction so you can see what we are going to be learning and decide if you want to join in. Obviously you can join in at a later date but if you start at the beginning with me then you will be able to comment or tweet me questions so I can help in any areas where you are confused.

For the next 3 weeks I will be posting every Tuesday and Friday to get you started with some sewing lessons. These are my planned topics:

What You Need To Learn To Sew (No Matter How Small Your Budget)
Hello Sewing Machine
Have a Go At Sewing
Follow The Seam: Straight, Curves and Corners
Hello Fabric
Understanding Patterns
Project Ideas For You to Make


After these introductory lessons I will go through 2 step-by-step projects and break it down into really manageable chunks. One will be focused on quilt techniques and the other on an item of clothing. I learned to sew quilts first and I think its a great place to start. They have no complicated sewing techniques and it's relatively easy to make a simple quilt that has a bit of a wow factor. The other project will be geared towards someone hoping to make clothes. Sewing clothes is slightly more complex but I have a very simple project in mind. If a handmade wardrobe is what you are aiming for then this one is for you. Or of course you can join in with both!

After these two projects Sewing School will become a regular feature on Tadpegs. Each time I write a new tutorial for a new sewing technique it will come under the heading 'Sewing School'. So if you have any questions already just leave a comment or you can tweet me (@zoeblofeld). Don't forget to come back on Tuesday for the first installment. Zoe x

My Blogging Story and 12 Lessons So Far

As you might have seen last week my blog has turned 1! Woopee! I was pretty excited to reach this particular milestone and I have learned loads over the last 12 months. I wanted to tell you a bit about my blogging story and draw out a few tips for you if you are thinking of starting a blog too. But first let me say this. I can only tell you what I have learnt in 12 months. I have no authority to speak about much further than starting a blog. I do however have much to say about starting one

My blogging story started about 18 months ago. My 3rd baby had been born and I really had a sense of wanting to do something different to stop my whole life being consumed by being a Mum. Don't get me wrong I love being a parent but I wanted something separate that was just for me. This is why I don't write much about my children here, its a space for making not for mummying. At around the same time I had become hooked on one blog in particular. I had been reading it for a while but I was really starting to catch a part of the writers enthusiasm for blogging about a handmade lifestyle. I knew their skills were different to my own so I didn't want do the same as them but I would say they were definitely my inspiration for wanting to start a blog. However at first I was too heavily influenced by them. I would be sketching out ideas for projects and for my blog design and I realised it was so close to what they already offered. Apart from the fact that they are the professionals and I can't compete with them I realised that if I wrote the same things as them I would be copying (which is both immoral and illegal) and I would be writing a boring blog that was the same as many others out there. So I wrote down all the things I was passionate about that came under the heading 'craft and lifestyle' and I settled on some themes that I wanted to write about. My first lesson in blogging I learned months before I even started my blog. Lesson #1: Don't Copy, Be Yourself.

Over the few months I wittled down my ideas to a more defined, but not too defined, set of topics that I wanted to write about and started thinking about what to call my blog. This was a tough decision. Using my list of topics I played around with words that sounded good together and would come up with several great names, only to discover that someone (or sometimes several people) had beaten me to it and the blog name was gone. It was very frustrating. One day I thought of the name Tadpegs. It wasn't just a random thought that came into my head. The word 'Tadpegs' was a nickname my Mum and her family used to call their house. It felt nice to have a name with sentimental value. It also sounded to me to suit a craft blog some how. So I googled it and there wasn't a lot to find. Most importantly there wasn't a blog already called 'Tadpegs'. So I made the decision to go for it. I registered my blog with blogspot and Tadpegs was born. Lesson #2: Take Time Choosing Your Blog Name.


I registered with blogspot because I knew that this google hosted blogging service was free and simple. Something that worked for me as a beginner and amateur blogger. I also had read that you can switch to another host at some point in the future. I hear a lot of people argue that wordpress is the only way forward. For someone just starting out and testing the waters I think its a good idea to try something free first, then to invest later if you outgrow it. I haven't outgrown blogger yet so I have had a whole year of free blog hosting. I also know of  few professional blogs that are not hosted by wordpress. So Lesson #3: Don't Be Pressured Into A Blog Host That Doesn't Suit Your Needs. (Just to be clear it is possible to have a free wordpress blog, but to get the most out of them as a host you have to invest some money)

Once I had a name sorted and an outline of what I wanted to write about I finally got down to writing some posts. This was about 5 months into the planning process. I played around with a few different post layouts and experimented with the look of my blog. Eventually I came to posting my very first post and I had a couple more ready to go. For the first few months each post would look a little bit different. I soon settled into a particular format and now my posts are more consistent. I would say this is fairly important when you write a blog if you want to look professional. If you change every time, it looks messy. I am even tempted to take some of those early posts down because they don't meet my minimum standard for a post I would write now. I have decided to keep them up though. They don't drive much traffic but they are a reminder to me of how far I've come. Lesson #4: Choose a Format and Be Consistent.

As I mentioned above I had set myself the goal of posting twice a week. I wanted my blog to be regular and I knew if it wasn't I would give up. Two posts a week was actually a pretty reasonable target. I managed to meet it and after Christmas I even went up to 3 posts a week for a while. By posting according to a schedule I had a plan of what I needed to write about next and how often I should make something new. It works for me having this schedule and I would recommend any new blogger deciding on a planned schedule of their own. Lesson #5: Decide on a Posting Routine and Stick to it.


As I became more particular about what my standards for posting my workload for the blog went up and up. I asked Cassie if she would write a regular feature on food. This helped me by lightening my load but it meant I had someone who was really passionate about food writing the food section. It was really nice to have an extra pair of hands writing with me. Lesson #6: You Don't Have to Work Alone

I know what you are thinking, 'but Cassie is stopping so how are you going to carry on?'. This is a good question. The answer comes in two parts. Firstly I have become a lot quicker at writing a post now than I was when I first started. I think about it more carefully before hand so when I sit down to write it, it is almost all done in my head and just needs to be typed out. Another reason for this is that now I have a particular post format I don't have to think too much about what it will look like, I have done all the prep work before I start. Lesson #7: You'll get quicker with practice

Secondly I have scaled back. I have mentioned already that at first I had a fairly wide subject to cover but now my aim is to be more focused. This has meant I have scaled back on the number of projects I am juggling at a time. Also I have cut back on the number of posts I write. Writing three per week was too much, especially when I started my new job (not blog related) so I scaled back down to 2 posts a week and I took a week off blogging to get things back on track. That is two lessons for you there. Lesson #8: Be reasonable about how much you can get done and Lesson #9: Take breaks when you need them.


Over the year I have realised that my main passion for handmade is for sewing. So I am going to be focusing much more on this aspect of handmade from here on in. I think this is a very important lesson and one that I need to keep reminding myself. While it's a good idea to have a focus for you blog and not just write about everything that goes on, it is ok to let your focus evolve. My focus started out as quite a large subject area but has slowly become much more 'niche'. This is playing to my strength and my interests. However I think it is also ok to let your blog become less focused. I'm not saying open the gates so wide than anything you fancy writing about becomes acceptable. But maybe allowing a few streams of interest, that are somehow related to your original theme, to come through is alright. After all blogging should be fun to write as well as fun to read. This is probably my most subjective lesson though and I can hear some people disagreeing already. Lesson #10: Let your blog evolve.

I have not finished learning about blogging yet. You'll notice I haven't shared any tips about growing your audience or about perfecting any area of your blog. I read articles and other bloggers posts about these areas and I find them interesting. Be careful though, sometimes I see a link that says something like 'How to earn £10000 from your blog' or 'Increase Traffic to your blog in 3 easy steps.' At first I would click on these and read them. It doesn't take long to realise though that most of these articles are written by complete amateurs who want to get as much traffic to their blog as possible. Don't fall into the trap of following their advise, they often don't know what they are talking about and have no authority to write about it (just as I do not). It is very difficult to find the good advise amongst all the nonsense. So I would suggest you spend your first year in blogging, or at least your first few months, improving your writing and establishing you style. Whats more, you may find in your first few months you don't get much response when you post something new, no comments and no new followers. Thats ok and I would guess normal. Just keep writing and learn as you go, the followers come later. Lesson #11: Focus on your content, not your followers.


However I can share with you one small lesson I have about how to network your blog. There are hundreds of places to share your content in the hope that some one new might read it. If you look outside of the ones your probably can think of easily (Facebook, Twitter, Pinterest, Google+) there are loads of others. Commenting on other blogs, answering question in forums, sharing your links on Reddit or StumbleUpon. The list is long and very time consuming. If you really want to make an impact though you need to spend more time on writing good stuff than on sharing it in as many places as possible. I would say pick 2 or at most three places you are going to focus your attention on sharing it and stick with those. Then you can make a real impact in those places and you might actually get some genuine followers who will come back again and again. These ones are much more valuable than the people that click on a link once and never see it again. Plus you probably won't have the time to promote yourself on all of them! #12: Limit yourself to 2-3 social networks to promote yourself (for now). 

This post is by far my longest I have ever written. So much for sticking to a particular post format. I wanted to share a bit more about myself and my experience so far. I am still learning though and still enjoying myself. If your thinking of entering into the blogging game I hope this helps. Zoe xx

An Autumnal Lilou Dress (Even Though The Summer Has Only Just Arrived)


Here is my first Lilou. (From Love at First Stitch). I say first because I will definitely be making another one of these babies. I love this pattern, it's very flattering but comfortable to wear too. Plus I finally invested in an invisible zip foot for my sewing machine and it was totally worth it, you can hardly see the zip at all. No picture of the zip I'm afraid because I didn't realise how crinkly the back was when I took the pics so you'll just have to trust me.


Now I just have to go back and re sew all my other 'invisible' zips I put in with just a regular zip foot. So as you may have noticed, this Lilou dress is some what more autumnal that the current weather. Let me explain. Last month I went on holiday to Scotland. Let's be honest you don't go here for the weather but it was actually quite beautiful. Any way, I went into a charity shop and found some tartan curtains on sale and I just couldn't leave them behind. I was trying to find some summery check fabric for ages and gave up due to it being very expensive so when I saw this I didn't want to miss out. I decided it would be perfect for a Lilou, although I won't actually be wearing it out until the weather get's cooler. I'm happy to wait though so the sun may keep shining! I think when the Autumn does come I will probably wear it with my leather jacket though.


As I mentioned I really enjoyed working with this pattern, it only had four pattern pieces to was easy to work with. The tartan added a complication as I had to pattern match carefully or it would look silly. I did a reasonably good job of this but if you look closely you can see that the centre line of the tartan isn't quite straight.


Because of the pattern matching the darts and pleats don;t quite match up and I had to add an extra pleat in the back of the skirt to make it work. This wasn't too tricky though. The back isn't quite matched perfectly either but at least you can't see the zip!


I would like to make another Lilou that is a bit more summery and one that has the scalloped neckline too. Probably it will be finished just in time for winter. Or maybe I should just get on with it. Zoe x

Tadpegs Birthday!


Happy Birthday Tadpegs!  Today marks the one year anniversary of my very first post. I know that I am probably the only person who is particularly excited about this birthday but you can celebrate along with me but drooling over this pavlova. Nom Nom Nom. My first post included a pavlova picture so I thought it would be an appropriate birthday treat.

I have loved my first year in the blogging world and I have learnt so much! I will share with you my lessons from my first year another time in case you're thinking about starting a blog. I have also learnt so much about so many different crafts. Photography, sewing, crochet, baking and others.


This year has also shown me that my real passion when it comes to craft lies in sewing. Slowly over the last twelve months the focus of this blog has shifted towards being a sewing blog rather than a general handmade blog. From now on you will probably see even more of a focus on sewing. My intention is to have a sewing focus with occasional other posts about topics that also help create a handmade life.


Another thing I need to tell you all is that Cassie has decided to stop writing regularly for Tadpegs (insert sad face here). I love her recipes and I know readers do too but Cassie wants to focus on other things instead of writing. She has a few posts she had been planning for a while that you will see so make sure you come back for those.


One year in to my blogging adventure has left me just as keen we when I first started, I won't be stopping just yet. Keep your eyes pealed for the start of sewing school soon. Now I'm off to eat some pavlova. Zoe xx

P.S For this pavlova I used Jamie Olivers pavlova recipe for my mirangue but halved the quantities, it is foolproof and delicious. The just whipped the cream and added the fruit. x

7 Tips for Photographing Your Craft


When it comes to photographing your craft, the photography is a whole new craft of its own. Sure you can take a quick snap on your phone and share it on instagram but taking a photo that can compete with the pros is another story altogether. I have been blogging about craft for nearly a year now and I have learnt a whole heap about craft photography. So today I am going to share some of my tips to help your pics look better too.

1. Finding the Light is the Most Important Step
I know I've said this before, but I will say it again, finding the light for your photograph is the most important step. You need plenty of it. Shoot in the day time and preferably outside. If its really sunny though find a shady spot or you'll end up with harsh shadows. If you need to shoot indoors then pull back the curtains and let as much light into the room as possible. If you would like to read more about finding the light, check out this post here.


2. Set Up the Scene
Clear a space and declutter, people will notice if you have lots of rubbish in the background so move it out the way. Your scene might be indoors if you want your item to be photographed in its new home and thats ok, just pull back the curtains. If you need to, hang up some fabric as a background or pop a chopping board on the ground to make a simple surface. Then put your finished craft in your scene. You want this to be the focus of your photo so make it the focus.

3. Take a look down the lens of your camera
Once you have set up your scene, peek down the camera and check its all in the shot. You might need to adjust your background to make sure you can fit everything in in one go. Equally leaving some blank space can really help your photo pop, but make sure that your empty space really is empty and not all cluttered.

4. Set Your Camera to Aperture mode
This mode on your camera allows you to control your depth of field. You can read more about it here but the important thing to remember is the smaller the f-stop number the greater the aperture and the shallower the depth of field. Experiment with this mode a little (you might need your camera manual to find out how) to figure out what I mean.


5. Take some shots of the whole item with a medium aperture
With a medium aperture you will have the whole item in focus so you can really show off your finished craft. Take a few from different angles to capture every part of it. Also don't be afraid to take more than you think you will need, you can always delete the not so good ones later.


6. Take some shots of the details with a large aperture (small f-stop)
Zoom in and take some pictures with a large aperture. This will blur the back ground and give focus to the details. Show off the areas where you have learnt a new skill, improved an old one and the parts that look extra pretty.


7. Don't worry if it doesn't work out the way you planned
I was so proud when I finished my octagons quilt that I was even more excited to photograph it than usual. We took it outside and starting taking pictures. But the wind was super strong that day and I just couldn't get a good shot. I decided to use the photograph any way because it was funny and made it real. Don't be afraid to use these silly shots sometimes, I think they add character.

Do you have anything to add? Feel free to chip in by adding a comment and you can help us all get better too! Thanks, Zoe x

My Lessons From Me-Made-May


Me-Made-May has been fun. I have learned so much, and this is the whole point of the challenge so I am pretty pleased I stuck with it. Over the month I have worn most of my handmade items a few times each, I simply haven't sewn enough clothes to wear something different every day at the moment. These are my lessons from this past month:

1. Sewing basics is good, but I need to make more if I want to wear it every day
I have always had in my mind, well since I started sewing clothes, that I didn't just want to make a few fancy dresses and stick them at the back of the wardrobe to be only worn once. I have made an effort to sew clothes that I would wear on a day to day basis. This has been a good choice. I have had plenty of items to wear for my day-to-day having made several tops, skirts and a few casual dresses. I need to keep at it though if I want to wear handmade all the time though because I am now a little bored of wearing the same top 4 times in one month!


2. Find patterns that are both casual and flattering
I much prefer to wear the clothes the have a fitted waistband, they suit me more. I think I didn't really realise this at first though and quite a few of my tops are not so fitted, or bottoms that have too much fabric and make me look too heavy on my hips. They are ok for every day 'mum' outfits but I'd really like to wear something that is both casual and flattering at the same time. This is something to work towards.

3. I hate ironing!
I don't normally iron my clothes, unless I am dressing up for an important occasion any way. Sure I press seams when I need to but that'd totally different. I hate ironing clothes. The trouble is lots of the clothes I have made so far require ironing. Not just when I want to go the extra mile but they need ironing every time I wear them. I need to look into finding fabrics that require less ironing.


4. I need to figure out my preferred colour palette.
Some of my clothes that I have made I love and I wear them regularly regardless of whether its May or not. For example my chambray Elisalex, I love this dress to pieces, its both casual(ish) and flattering and so easy to change the outfit but wearing it with a multitude of different accessories. Others however I am not so keen on. My picnic blanket skirt just doesn't really go with any of my other clothes so I want to work out a colour palette to start sewing with.


5. Taking daily outfit photos is hard!
I really wanted to take outfit photos every day. Not so much so I could share it all but more so I could have a record of what I wore every day. Trouble is I am a bit of a perfectionist when it comes to photos these days. So taking photos of my outfit every day, therefore a photo of myself every day, was terribly tricky. I gave up halfway through the month because I was just repeating the things I was wearing any way. This is something to work on for next year.

6. I need to make something sparkly
I have done really well making things for every day, but I haven't really made anything for looking fancy in. I need to get on it quick and make myself a party dress.

7. It feels good to wear handmade
There is something to be said for going out wearing something that you have made myself. I feel really proud of myself that I have done this for a whole month. Eventually I want to be able to wear all (or at least mostly) handmade clothes. What could be better than knowing you didn't buy the clothes you wear but you actually made them with your own two hands? Well to me thats a pretty good feeling.

I am looking forward to May next year already. Don't forget to add your suggestions for sewing school. Thanks. Zoe xx


Related Posts Plugin for WordPress, Blogger...