
My sewing machine is a Singer Confidence which was a birthday present for my 21st. Whatever brand you have the basics are the same. Before you can start sewing you need to set your machine up. The very first step is 'winding the bobbin'. So plug your sewing machine in and turn it on. You will also need to connect up the foot peddle. Once you are all plugged in, make sure you can sit on a chair with your sewing machine in front of you an can comfortably reach the peddle with you foot. Don't press on the peddle yet though!

Wind the Bobbin
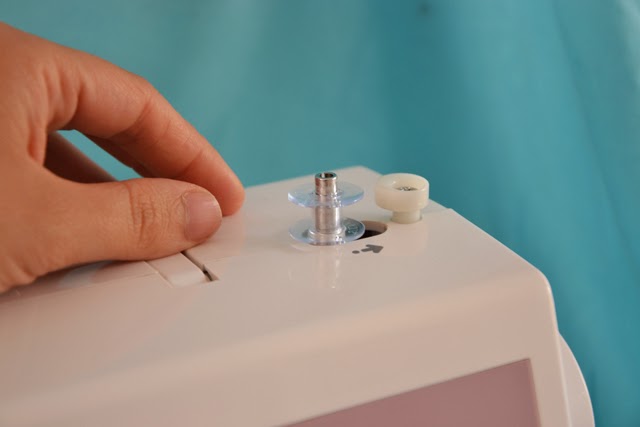
To wind up the bobbin you need to put some thread on your machine. You may have one or two places to put your thread on. My machine (as indicated by the arrows) has two. The larger arrow points to a horizontal post, if you have one of these it is a better option for where to put your thread reel, just slide your thread reel on an then put on a little stopper to prevent the reel from coming off. The smaller arrow points to a little hole where a similar post can go but is vertical. You may only have this vertical post on your machine but pop your thread reel on in the same way. I am using my vertical thread post this time because my reel is too large for the horizontal one.


Now hold onto the end of the thread and press down on your foot peddle. This will start the winder turning around and will wind up thread onto your bobbin. Once the bobbin has enough thread on it should stop winding up, thanks to the winder stopper. It should look like this:


Attach the presser foot
If you haven't already got a 'foot' on your sewing machine this will be the next thing you need to do. Choose the foot that looks like the one above and rest it under the place where your needle is. The pull down the 'presser foot lever'. The foot should snap onto the foot holder but if it doesn't work first time wiggle it around and try again. The next thing to do is to thread the reel.

Thread the Reel
Your thread reel should still be on the top of your machine in the right place. Take your newly cut end (after winding the bobbin) and pull it behind the thread guide as you did when winding the bobbin. This time instead of taking it to the right and into the bobbin you need to pull it down the right hand slot in the front of the machine (as above).

When you reach the bottom of the slot, pull it back up the left hand slot and around the metal lever, then back down the same slot. When you reach the bottom of this slot, take the thread behind the thin metal hooks that are at the top of the needle and finally push the end of the thread through the sewing machine needle from front to back.You may find you need to snip the end of the thread to get rid of any frayed ends to make it easier to pass it though the needle.
Next up you need to put the bobbin under the needle plate ready for sewing, we call this threading the bobbin.

Thread the Bobbin
Again this varies from machine to machine but I will go through how to load your bobbin on a top loading machine. There will be a little plastic cover just underneath where the needle is, you will need to take this off. Then pop your bobbin inside the little round space, making sure the thread end is coming off in an anti-clockwise direction. My machine has a handy little diagram to show you how, but don't worry if yours doesn't, you'll get used to doing this quickly enough. Pull the end of your thread out and underneath a little metal groove near the front of the bobbin.
Finally you need to bring the thread from the bobbin up so you can start sewing. The end of your thread from the bobbin needs to be up near the needle plate. Using your left hand hold on to the end of the thread from the reel, then with your right hand turn the hand wheel, on the top right of your machine, around. Turn it until the needle has gone down and up again and it will pick up the thread. Then use some small scissors to scoop the thread out of your machine. Now pop your plastic cover back on.
Next up you need to put the bobbin under the needle plate ready for sewing, we call this threading the bobbin.
Thread the Bobbin
Again this varies from machine to machine but I will go through how to load your bobbin on a top loading machine. There will be a little plastic cover just underneath where the needle is, you will need to take this off. Then pop your bobbin inside the little round space, making sure the thread end is coming off in an anti-clockwise direction. My machine has a handy little diagram to show you how, but don't worry if yours doesn't, you'll get used to doing this quickly enough. Pull the end of your thread out and underneath a little metal groove near the front of the bobbin.
Finally you need to bring the thread from the bobbin up so you can start sewing. The end of your thread from the bobbin needs to be up near the needle plate. Using your left hand hold on to the end of the thread from the reel, then with your right hand turn the hand wheel, on the top right of your machine, around. Turn it until the needle has gone down and up again and it will pick up the thread. Then use some small scissors to scoop the thread out of your machine. Now pop your plastic cover back on.
And thats it, you have set up your machine ready to have a go a sewing. Come back on Tuesday to learn how to do so. Zoe xx
For more about Sewing School have a look here.
No comments :
Post a Comment